5. Building a Simple PolyNet 4.0
5.1 Creating a Dialog
5.2 The Symmetry Dialog5.2.1 The Symmetry Dialog5.3 The Line Breaker Dialog
5.2.2 Display the Existing Symmetry
5.2.3 Set New Symmetry
5.4 PolyNet Commands
5.5 Test Run
5. Building a Simple PolyNet 4.0
In this chapter, we will create a simple version of PolyNet 4.0. Most of the work was done in the last chapter. We will simply copy it as follows:
1. Copy C:\�\chap4 to produce directory, C:\�\copy of chap4 .Now everything in chapter 4 is in chapter 5. We need to add two more buttons in this chapter: Symmetry and Line-breakers. This example is also in c:\polyapplet63\chap5\.2. Rename C:\�\copy of chap4\ to C:\�\chap5\ .
3. Rename File:
chap4.sln to chap5.sln.
chap4.suo to chap5.suo.4. Start the project by clicking to chap5.sln.
5. Rename the project to �chap5�.
6. Right click the Project, go to Property Window and set:
Assembly name: chap5
Default Name Space: chap5.7. Go to Form1.cs and change the name space to chap5.
To create a "Symmetry" dialog:
1. Right click the Project Name �chap5� and select "Project/Add New Item/Windows Form".Now we will add two Commands to form1:
2. Set Form2.Text = �Symmetry�.
3. Repeat the above process to create a "Line Breaker" Form, Form3. Now you will have two dialog boxes.
1. Add 2 buttons:
Control Object Description2. Go to the Property Window and set:
--------------------------------------------------------
Button Button open Symmetry Dialog
Button Button10 open Line Breaker Dialog
Object.Property Value3. Add the following code in boldface to Form2:
---------------------------------------------------------
Button9.Text "Symmetry"
Button10.Text "Breaker"
public class Form2 : System.Windows.Forms.Form
{�
Form1 a;private System.ComponentModel.Container components = null;
public Form2(Form1 a1)
{
a = a1;
InitializeComponent();
}
Repeat the above for the Breaker form.
4. Open Symmetry and Break Dialog:
Double click the Symmetry button and the Breaker button and enter the code:
private void button9_Click(object sender, System.EventArgs e)
{private void button10_Click(object sender, System.EventArgs e)
Form2 symmetryForm = new Form2 (this );
symmetryForm.ShowDialog ();
}
{Run the program, and Figure 5.1 will appear.
Form3 breakerForm = new Form3 (this );
breakerForm.ShowDialog ();
}
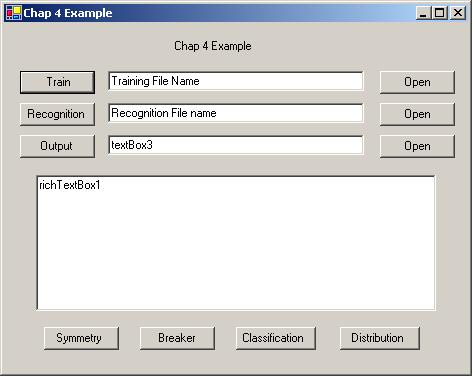
Figure 5.1 A simple PolyNet 4.0.
Click the Symmetry button, Figure 5.2 will appear.

Figure 5.2 The Symmetry Dialog.
The Symmetry Dialog will specify the symmetry of the PolyApplet. This dialog will fulfill two tasks:
- Show the existing Symmetry; and
- Change Symmetry settings.
Where?5.2.1 The Symmetry DialogWhat?
- where Symmetry starts
- where Symmetry ends
- the x-dimension of the Symmetry
- the y-dimension of the Symmetry
OK/Cancel
- 1-D Translation (1)
- 1-D Scaling (2)
- 2-D Translation (3)
- 2-D Scaling (4)
- 2-D Rotation (5)
- 2-D Scaling and Rotation (6)
- Accept the new setting
- Cancel the new setting
1. Add 4 Labels to the Symmetry Dialog; go to the Property Window and set:
Object.Property Value
-------------------------------------------------------
Label1.Text "Symmetry Starts:"
Label2.Text "Symmetry Ends:"
Label3.Text "X dimension:"
Label4.Text "Y dimension:"
2. Add 4 TextBoxes:
textBox1, textBox2, textBox3, textBox43. Add a GroupBox; go to the Property Window and set:
Object.Property ValueAdd the following RadioButtons to groupBox1; go to the Property Window and set:
-------------------------------------------------------
groupBox1.Text �Symmetry�
Object.Property Value4. Add 2 buttons and go to the Property Window and set:
-------------------------------------------------------
radioButton1.Text "1D translation"
radioButton2.Text "1D scaling"
radioButton3.Text "2D translation"
radioButton4.Text "2D scaling"
radioButton5.Text "2D rotation"
radioButton6.Text "2D scaling, rotation"
Object.Property ValueRun the program, click the Symmetry button, and Figure 5.3 will appear.
-------------------------------------------------------
button1.Text "OK"
button2.Text "Cancel"
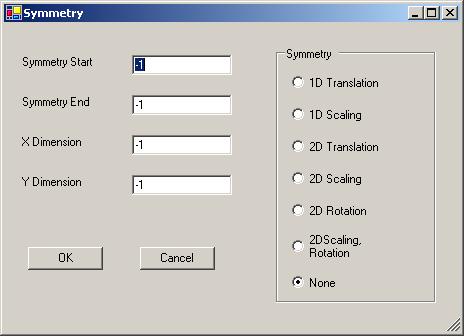
Figure 5.3 The Symmetry Dialog.
5.2.2 Display the Existing Symmetry
The Symmetry Dialog is responsible for:
- Displaying the existing Symmetry;
- Passing the new Symmetry setting back to the main project.
public PolyApplet63 x;Add the following by double clicking form2:
private void Form2_Load(object sender, System.EventArgs e)
{This code displays the current Symmetry setting.
textBox1.Text = ""+ a.x.getSymmetryStart () ;
textBox2.Text = ""+ a.x.getSymmetryEnd () ;
textBox3.Text = ""+ a.x.getSymmetryXDimension () ;
textBox4.Text = ""+ a.x.getSymmetryYDimension () ;int sym = a.x.getSymmetry ();
if ( sym == 0 )
radioButton7.Checked = true;
else if ( sym == 1 )
radioButton1.Checked = true;
else if ( sym == 2 )
radioButton2.Checked = true;
else if ( sym == 3 )
radioButton3.Checked = true;
else if ( sym == 4 )
radioButton4.Checked = true;
else if ( sym == 5 )
radioButton5.Checked = true;
else if ( sym == 6 )
radioButton6.Checked = true;
else
radioButton7.Checked = true;
}
To pass the new Symmetry setting back to the main project, double click the OK button and enter the code:
private void button1_Click(object sender, System.EventArgs e)
{Now the Symmetry Dialog is operational.
try
{
a.x.setSymDimension (
int.Parse (textBox1.Text),
int.Parse (textBox2.Text ),
int.Parse (textBox3.Text ),
int.Parse (textBox4.Text )) ;
int sym = 0;
if ( radioButton1.Checked )
sym =1;
else if ( radioButton2.Checked )
sym =2;
else if ( radioButton3.Checked )
sym =3;
else if ( radioButton4.Checked )
sym =4;
else if ( radioButton5.Checked )
sym =5;
else if ( radioButton6.Checked )
sym =6;
a.x.setSymmetry (sym);
}
catch
{
MessageBox.Show ("Please enter valid integers", "Entry Error");
}
this.Close();
}
The Line-Breaker Dialog is similar to the Symmetry Dialog. The procedure is:
1. Add 4 Labels, 4 TextBoxes, and 2 buttons to the Line Breaker Dialog. Set:
Object.Property ValueRun the program, click the Breaker button, and Figure 5.4 will appear.
-------------------------------------------------------
Label1.Text "Line 2 starts:"
Label2.Text "Line 3 starts:"
Label3.Text "Line 4 starts:"
Label4.Text "Line 5 starts:"
button1.Text "OK"
button2.Text "Cancel"
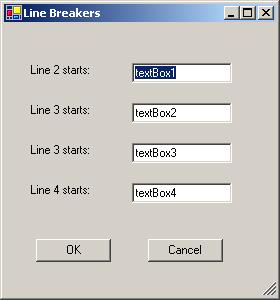
Figure 5.4. The Line-Breaker Dialog.
2. To receive and display the current Line-Breaker setting, add the following code to the Line-Breaker Dialog:
private void Form3_Load(object sender, System.EventArgs e)
{3. To set a new Line-Breaker setting, double click OK button in Form2 and enter the following code:
textBox1.Text = ""+ a.x.getLineBreaker1 () ;
textBox2.Text = ""+ a.x.getLineBreaker2 () ;
textBox3.Text = ""+ a.x.getLineBreaker3 () ;
textBox4.Text = ""+ a.x.getLineBreaker4 () ;
}
private void button1_Click(object sender, System.EventArgs e)
{Now the Line-Breaker Dialog is operational.
try
{
int i1 = int.Parse (textBox1.Text );
int i2 = int.Parse (textBox2.Text );
int i3 = int.Parse (textBox3.Text );
int i4 = int.Parse (textBox4.Text );a.x.setLineBreaker (i1, i2, i3, i4);
}
catch
{
MessageBox.Show ("Please enter valid integers", "Entry Error");
}
this.Close();
}
5.4 PolyNet Commands
Double click the Classification button in form1 and change:
x.classificationto
x.polyClassificationDouble click the Distribution button and change:
x.Distribution ()to
x.polyDistribution ()Now you have built a simple PolyNet 4.0.
To test:
1. Run the program.
2. Training file: the default file is �.\example1a.txt", where �.\� is chap5.exe directory (�C:\polyapplet63\chap5\bin\Debug\�). Select �shifter1a.txt� as the training file. Click the "Open" button to make sure ".\shifter1a.txt" is the training file for the shifter problem, which will look like this:
*3. Recognition file: the default recognition file is ".\example1b.txt�. Select �shifter1b.txt� as the recognition file. Click the "Open" button to make sure ".\shifter1b.txt" is the recognition file for the shifter problem, which will look like this:
shifter, Training Data File
*
33006 600600000000066
660060000000006
700 700770700007700
007707000077007
*4. Output file: the default file is ".\example1c.doc�.
Shifter: Recognition Data File ( 1 neuron 1 class )
*xxx 070700007077070
707000070770700
xxx 022002000020000
022002000020000
�
5. Symmetry setting: Click the Symmetry button and set:
Symmetry starts: 36. Line-Breaker setting: Click the Breaker button and set:
Symmetry ends: 32
x-dimension: 30
y-dimension: -1
1D translation check
Line 2 starts: 37. Run: click the "Classification" button and �Distribution� button to complete the neural computation. The results for �Distribution� button is:
Line 3 starts: 18
Line 4 starts: -1
Line 5 starts: -1
xxx
070700007077070
707000070770700
-----------------------
001 41
040 10
009 70
900 26
050 20
400 144
002 40
003 11
600 64
800 114
500 35
004 60
-----------------------
400
070700007077070
707000070770700 144 1
xxx
022002000020000
022002000020000
-----------------------
010 106
030 500
001 34
040 88
009 39
050 144
002 160
070 58
090 23
020 640
004 44
060 102
-----------------------
020
022002000020000
022002000020000 640 1