3. FACEFINDER
3.1 Introduction3.1.1 Expectation3.2 Identification
3.1.2 FaceFinder Input
3.1.3 FaceFinder
3.1.4 Restrictions3.2.1 Operation3.3 Verification
3.2.2 Template Matching Output
3.2.3 Checking Identification Results
3.2.4 Analysis
3.2.5 Examples
3.2.6 Identify with the Template File3.3.1 Operation
3.3.2 Example
This is an example of a customized version of the ImageFinder, applied to the Feret Facial Image Database. All parameters are eliminated.
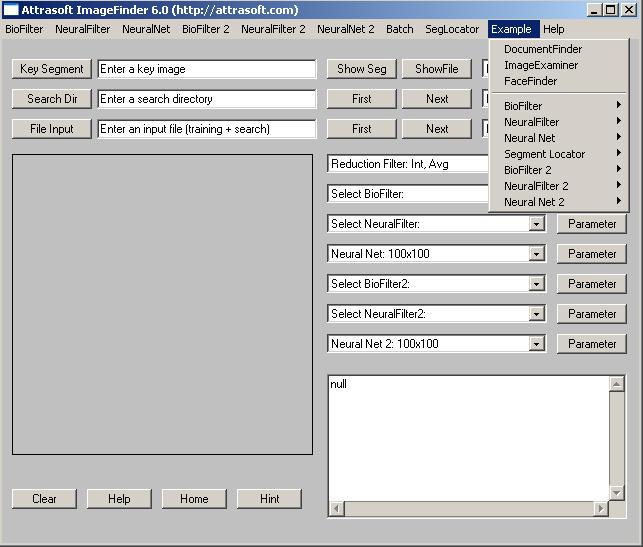
Figure 3.1 Example Menu.
To start the FaceFinder in the ImageFinder, click menu �Example/FaceFinder�.
Figure 3.2 The Feret Database.
3.1.1 Expectation
With image matching, the face images are converted into templates first.
This one-time conversion runs at the speed of several images per second.
After
that, the template matching runs at a speed of higher than 100,000 matches
per second and it will eliminate about 98% - 99% of unmatched images.
This means if you want to match one newly captured image against 1,000,000
existing images, in a matter of seconds, the FaceFinder will reduce
the 1,000,000 possible matches to about 10,000 candidates. At this point,
the other types of matching can further narrow down the retrieved set.
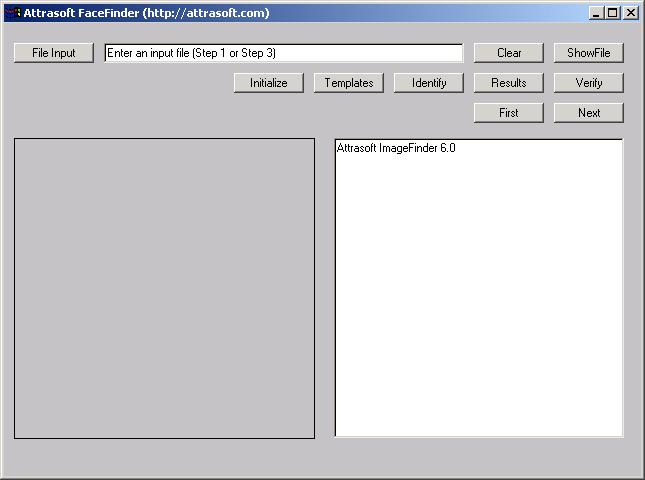
Figure 3.3 The FaceFinder.
There is only one example in the FaceFinder, with following results:
Total Images N = 1,032 = 516 pairsThis example has 516 pairs of face images or 1,032 images. In the N x N Match, each image matches itself and its partner in the pair, giving a total of 2 * N = 2 * 1,032 = 2,064 positive matches.
Possible Matches N*N = 1,065,024
Attrasoft Matches = 14,300Actual Duplicates = 2,064
Attrasoft Found Duplicates = 2,064Percent Eliminated = 98.7 %
= 1 � 14,300/1,065,024
Percent of Duplicates Found = 100 %
= 2,064/2,064
There is only one way to enter data into the FaceFinder, by input file. The FaceFinder will compare each of the images in the file to all other images in the file. Clicking the �File Input� button and selecting a file can specify the input file.
The input files list one image per line. Each line specifies an absolute path. For example,
C:\xyz1\0001.jpgThere is one file for Identification in the software CD, �facefinder_input_id.txt�, and there is one file for Verification, �facefinder_b1_first10.txt�.
C:\xyz1\0002.jpg
C:\xyz2\0003.jpg
C:\xyz2\0004.jpg
�
The FaceFinder is an example of a customized version of the ImageFinder. There are many parameters in the ImageFinder. The FaceFinder has eliminated all of the parameters.
The image matching will be done in three steps:
- Training and Initialization
- Converting Images to Records
- Template Matching
Training/Initialization
Initialization loads the ImageFinder parameters. Training uses the data collected in advance. Both steps are combined together and done in a single click.Converting Images to Records:
This step is slow (several images per second); however:Template Matching(1) This step can be done once for all; and
(2) This is linear, i.e. the time is directly proportional to the number of images.Therefore, this step does not have much impact on the operating speed. If you use the default images, the records are loaded when you click the �Initialize� button.
The matching speed will be between 100,000 and 1,000,000 comparisons per second.
The restrictions are:
Feret database;
Front view;
Distance between the Camera and the face is fixed;
Light condition is fixed;
Image dimension is 256 x 384;
Image type is jpg.
The image Identification will be done in three steps:
- Initialization and Training
- Converting Images to Records
- Template Matching
The Identification procedure is:
- Initialization;
- Convert images in the input file to records and save them to a1.txt;
- Complete Template Matching and print the results to b1.txt.
1. Initialization and Training
Initialize and train the software by clicking �Initialize� button. This button will first initialize the software, which simply means to load the parameters; then train the software, which is similar to the ImageFinder. At the end of this step, you should see:2. Entering Data
Parameters loaded!
bioFilter loaded!
�
Neural Filter loaded!
bioFilter 2 loaded!
Neural Filter 2 loaded!
Select input file by clicking the �File Input� button. In this example, the input file for the Identification example is �.\facefinder_input_id.txt�. Select this file. This file has 1,032 images and the software will go through each one of them to make sure the files exist. This will take a while and at the end of this process, you should see:3. TemplatesNumber of blocks = 1Buttons:
Block 0. Length = 1032
C:\�\00019ba010_960521.jpg
C:\�\00019bj010_960521.jpg
C:\�\00029ba010_960521.jpg
C:\�\00029bj010_960521.jpg
�To see the original content of this file, click the �ShowFile� button. To clear the text window, click the �Clear� button. To see the first image in the input file, click the �First� button. To see the next image in the file, click the �Next� button. If you keep clicking the �Next� button, the FaceFinder will scan through all images.
If you use the default images, this step is optional because the records are loaded when you click the �Initialize� button.Convert images in the input file to records by clicking the �Templates� button. The results are saved to a1.txt. Once the image is converted into internal templates, you do not have to convert them again. This step is slow (several images per second); however:
Therefore, this step does not have much impact on the operating speed.This step can be done once for all; and This is linear, i.e. the time is directly proportional to the number of images.
4. Template Matching
Identify matches by clicking the �Identify� button. The FaceFinder will compare each of the images in the file to all other images in the file. If there are N images in the input file, there will be N*N comparisons.
5. Check the Results
Check the results of the template matching by clicking the �Results� button. The checking result will be printed to the text window; and it will indicate that the number of matches found in b1.txt will agree with the specifications in the b1_matchlist.txt. This will quickly let you know the positive identification rate. The matching information is stored in file, �fdacefinder_b1_matchlist.txt�.
3.2.2
Template Matching Output
The template matching runs at a speed of higher than 100,000 matches per second and it will eliminate about 98% - 99% of the unmatched images.
This means if you want to match one newly captured image against 1,000,000 existing images in a matter of seconds, the FaceFinder will reduce the 1,000,000 possible matches to about 10,000 candidates.
The result of matching each of the 1,032 images against the 1,032 images is in the file b1.txt. At the end of the matching, b1.txt will be opened for you. The b1.txt will look like this:
C:\...\data1\00019ba010_960521.jpgThis file is divided into blocks separated by a blank line. Each image has its own block. A block looks like this:
C:\...\data1\00019ba010_960521.jpg
C:\...\data1\00019bj010_960521.jpgC:\...\data1\00019bj010_960521.jpg
C:\...\data1\00019ba010_960521.jpg
C:\...\data1\00019bj010_960521.jpg�
C:\...\data1\01209fb010_940128.jpg
C:\...\data1\01063ba010_960521.jpg
C:\...\data1\01063bj010_960521.jpg
C:\...\data1\01209fa010_940128.jpg
C:\...\data1\01209fb010_940128.jpgTotal Number of Matches = 14,300
C:\...\data1\00019ba010_960521.jpg
C:\...\data1\00019ba010_960521.jpg
C:\...\data1\00019bj010_960521.jpg
The first line in this block is the input for Identification, the
rest of the lines are the output for Identification. In the above example,
00019ba010_960521.jpg matches with itself and 00019bj010_960521.jpg.
3.2.3 Checking Identification Results
If this is a test run, i.e. you know the correct answers; you can see the matching results in seconds. You must prepare a file, which indicates the matching pairs. To test the results in b1.txt, you must prepare B1_matchlist.txt file.
An example of b1_matchlist.txt is:
5
1 IMAGE00053770 IMAGE01312024
2 IMAGE00053771 IMAGE01312025
3 IMAGE00053772 IMAGE01312026
4 IMAGE00053773 IMAGE01312027
5 IMAGE00053774 IMAGE01312028
Line 1 is the �Line number� in this file. The �Line Number� does not have to be in order. Each line has the following format:
Number, tab, filename, tab, filename, tab.
Note:
(1) You must have a tab at the end of each line;
(2) The file names do not contain �.jpg�.
Once you get the two files prepared, click the �Results� button.
There are two common errors:
(1) The last Tab is missing;
(2) The number of rows is less than the first number in the file.
Check the results of the template matching by clicking the �Results� button. You will see the something like the following in the text window:
Checking Template Matching Results!The message indicates b1.txt has 1,033 blocks: the 1,032 image blocks plus the last line indicating the total number of matches retrieved. The message �Total Matches = 2,064� indicates that 2,064 matches in b1.txt agrees with those in b1_matchlist.txt.
Get b1.txt...
Character = 1060577
Lines = 16365
Blocks = 1033
Get b1_matchlist.txt...Check...
Total Matches = 2,064
There are several variables used to characterize a Verification or Identification.
For Verification, the common variables are:
Positive Verification Rate = 1 - False Rejection RateFalse Rejection Rate = 1 - Positive Verification Rate
Negative Verification Rate = 1 - False Acceptance Rate
False Acceptance Rate = 1 - Positive Verification Rate
The single characteristic number should be:
(1 - False Rejection Rate) * (1 - False Rejection Rate).
For Identification, the above method can be used. The alternative
is:
Positive Verification Rate = 1 - False Rejection RateFalse Rejection Rate = 1 - Positive Verification Rate
Elimination Rate = #Retrieved / #Possible Matches
Hit Ratio = # Correct Match / #Retrieved
The single characteristic number should be:
Positive Verification Rate * Elimination Rate * Hit RatioThere are several numbers that will be required for analysis:
Possible Matches
Let the total Images in the input file be N; the Possible Matches will be N*N.Attrasoft Matches
The number of retrieved matches is listed in the last line of b1.txt. Go to the end of b1.txt, you will see something like this:
Total Number of Matches = 14,300Actual Match
This number depends on your problem. It should be the first number in b1_matchlist.txt.Attrasoft Found Duplicates
Click the �Results� button to get this number, as discussed in the last section.Now you have all of the numbers, you can make an analysis.
Positive Identification
Positive Identification Rate = the results of clicking the �Results� button divided by the first number in file, b1_matchlist.txt.Elimination Rate
The Elimination Rate is 1 minus the number at the end of b1.txt divided by the number of possible matches.Hit Ratio
The Hit Ratio is the number indicated by the �Results� button divided by the number at the end of b1.txt.Composite Index
Finally, an Identification is measured by the multiplication of Positive Identification * Elimination Rate * Hit Ratio.
(1) Initialization and Training
Click the �Initialize� button; you should see:(2) Select Input FileParameters loaded!
BioFilter loaded!
�
Neural Filter loaded!
BioFilter 2 loaded!
Neural Filter 2 loaded!
Click the �File Input� button, select �facefinder_b1_matchlist.txt�; wait for a while, and you will see:(3) TemplateNumber of blocks = 1
Block 0. Length = 1032
C:\...\data1\00019ba010_960521.jpg
C:\...\data1\00019bj010_960521.jpg
C:\...\data1\00029ba010_960521.jpg
C:\...\data1\00029bj010_960521.jpg�
This step is optional if the default images are used. Click the �Templates� button and wait until the computer calms down. You should see each file name in the input file is listed, indicating the speed of converting images into templates.(4) Template Matching
Click the �Identify� button and wait a few seconds until the b1.txt is opened.
(5) Check the Results
Click the �Results� button and see the message of 2,064 matches.
(6) Analysis
Total Images N = 1,032 = 516 pairsTo Summarize,
Possible Matches N*N = 1,065,024
Attrasoft Matches = 14,300Actual Duplicates = 2,064
Attrasoft Found Duplicates = 2,064Percent Eliminated = 98.7 %
= 1 � 14,300/1,065,024
Percent Duplicate Found = 100 %
= 2,064/2,064
- Start the software;
- Click the �Initialize� button;
- Click the �Template� button (optional);
- Click the �Identify� button;
- Click the �Results� button.
3.2.6
Identify with the Template File
Your images were already converted into a template file earlier; you can run it without image conversion. Simply save the template file to c:\...\a1.txt and:
- Start the software;
- Click the �Initialize� button;
- Click the �Identify� button;
- Click the �Results� button.
The FaceFinder can also perform image Verification, but it is much slower (matching several images per second, rather than matching several hundred thousand images per second).
Verification requires multiple images or templates stored for each ID, say 5 images. The example used here has 516 pairs, i.e. each ID only has only one previous stored image.
The Verification procedure is exactly the same as the Identification procedure except at the end of the Identification procedure; one more step is added.
FaceFinder-Verification requires the FaceFinder-Identification as a preprocessing step. FaceFinder-Identification will eliminate 98 % - 99 % of the unmatched images and the Verification procedure will take care of the rest. The output of the Identification procedure, b1.txt, will be used as input for the Verification procedure.
After Identification, there is one more step for Verification:
Entering data
Click the �File Input� button and select an input file.Verification
Click the �Verify� button.
There is one FaceFinder example in this software. The input file is �b1_first10.txt�, which lists the first 10 blocks in the b1.txt.
The steps are:
- Click the �File Input� button and select �facefinder_b1_first10.txt�;
- Click the �Verify� button.
- 9 out of the 10 images are verified.
- The other one is a false rejection because there is only one previously stored image rather than 5 previously stored images.
- There is no false acceptance.