12. NEURALNET FILTER AND SHORT-SEARCH
12.1 Overview
12.2 Parameters
12.3 Short-Search, Long-Search, and File-Search
12.4 ImageFinder Operations for Short-Search
12.5 ImageFinder Operations for Short-Search (Advanced)
12.6 TradeMark Retrieval12.6.1 United Way - Rotation Symmetry12.7 Stamp Recognition
12.6.2 Tabasco - Rotation Symmetry
12.6.3 Mr. Potato - Scaling Symmetry
12.6.4 Monopoly - Scaling Symmetry
12.6.5 Chemical Compound12.7.1 Example 1
12.7.2 Example 2
12. NeuralNet Filter And Short-Search
This chapter will focus on the NeuralNet Filter and Short-Search. In all of the previous chapters, we used the output of the BioFilter and Neural Filter to feed the NeuralNet Filter. In this chapter, we will not use the Feature Space Filters, i.e. BioFilter and NeuralFilter. The purpose of this chapter is to see the how NeuralNet Filter works alone and learn the NeuralNet Filter commands.
The distinction between Identification and Search is their Outputs:
Identification
Identification is a one-to-many (1:N) Matching of a single sample set against a database of samples. The single image is generally the newly captured sample and the database contains all previously enrolled samples. Scores are generated for each comparison, and an algorithm is used to determine the matching record, if any. Generally, the highest score exceeding the threshold results in Positive Identification.Search or Retrieval
Search is similar to Identification, i.e. 1:N Matching; however, the result is a set of possible matching images, not a classification. "Identification" returns a classification, while "Search" returns multiple matched images.
The NeuralNet Filters, like BioFilters and Neural Filters, operate in two phases:
- Training; and
- Search.
1. The Keys: key-image(s), or key-segment(s) used to tell this software
what to look for.
2. The Search-Directory: images you want to search through.
Several clicks can specify these two parameters. Keys are fed into the software for training, i.e. teaching the NeuralNet Filters what to look for. After that, the ImageFinder will be ready to select similar images.
Attrasoft ImageFinder learns an image in a way similar to human eyes:
- Ignore the background;
- Focus on an object in the image.
1. Enter key-segments into the ImageFinder (keys are used to
teach the NeuralFilter what to look for);
2. Click the �NeuralNet/NeuralNet Train� command to teach the NeuralNet
what to look for.
3. Save all the images you want to look through into a directory (search-directory)
and enter it into the software;
4. Click the �NeuralNet/1:N Search� command --- the NeuralNet Filter
is now looking through the images.
5. The Output is a web page or text file, which is a list of names
and weights (scores):
- The weight of an image is related to the characteristics you are looking for (the weight is similar to an Internet search engine score);
- Click the link of each image and an image will pop up on the screen.
The NeuralNet Filter does require the following filters:
Image Preprocessing
Edge Filters;Normalization
Threshold Filters; and
Clean Up Filter.
Reduction Filter.
These filters will need to be set. The NeuralNet Filters will be
divided into Training and Search Phase. The parameters are:
1. Training
- Set Symmetry
- Set Translation Type
- Set Scaling Type
- Set Rotation Type
- Set Reduction Type
- Set Border Cut
- Set Segment Cut
- Set Blurring
- Set Sensitivity
- Set Internal Weight Cut
- Set External Weight Cut
- Set Segment Size
12.3 Short-Search, Long-Search, and File-Search
The NeuralNet Filter commands are divided into three types: Short, Long, and File. We introduced File- Search earlier. In this chapter, we will introduce Short-Search, and the next chapter will introduce Long- Search.
The Short-Search uses directory input. The Short-Search will not go to sub-directories. The limit for Short-Search is 1,000 images. All images to be searched must be in one directory, the search-directory. All images in the sub-directories of the search-directory will not be included in �Short-Search�.
There is no technical limit for the Long-Search. Long-Search can search millions of images. In the Long- Search, the search-directory can have many sub-directories. In this version, the default number is 3,000 sub-directories. All sub-directories must be only one level deep, i.e. the sub-directory cannot have other sub-directories. All images to be searched must be in the sub-directories. Each sub-directory can have up to 1,000 images.
If your search-directory has 3,000 sub-directories and each sub-directory has 1,000 images, then you can search 3,000,000 images.
There is no limit for the File-Search. File-Search can search any number of directories with any number of images. File-Search Does require the additional work of preparing the input file. The input file lists one image per line.
12.4 ImageFinder Operations for Short-Search
The Search procedure is:
- Training;
- Retrieving.
- The most important parameters for training are AOI, Segment Cut, and Symmetry.
- The most important parameters for searching are Blurring, Sensitivity.
Choose the three image processing filters where the sample objects will stand out;
Choose the three image processing filters where the black area is as small as possible, as long as it covers the key-segment(s).Example. Choose "Light Background 128".

Figure 12.1 �.\Uspto\IMAGE036.JPG�.
Step 1. Sample Image.
Example. To select �.\Uspto\IMAGE036.JPG�, click the "Key Segment" button; then choose the file.
Step 2. Training.
2.1 Set Focus: Select a Segment.
The simplest way is to click the Segment button and set it to �AutoSeg 10�. If no segment is chosen, the whole image will be used. Use image segments for searching similar images. Only use the whole image for exact matches.2.2 Symmetry:There are two situations where you should create a new sample image out of a sample segment:
You repeatedly use an image segment; The image segment is not a rectangle; say a polygon.
Your options are:No symmetry;
Translation symmetry;
Rotation symmetry;
Scaling symmetry, Oblique symmetry; and
Rotation and Scaling symmetries.
2.3 Set Segment Cut.
2.4 Click the �NeuralNet/NeuralNet Train� command:
By repeating step 1 and step 2, you can train the software with as many image segments as you wish, provided the memory used is less than your RAM. Use the Training button for the first segment; use the Retraining button for the second, third, ... , segments.
Step 3. Search Directory.
Example. To select: �.\Uspto\, click the "Search Dir" button; then click any file in �.\Uspto�.
Step 4. Search.
The most important parameters for searching are Blurring and Sensitivity. In a typical search, you will set these parameters and leave other parameters with the default values.4.1 Sensitivity
When the default setting yields no results, increase Sensitivity;4.2 Blurring
When the default setting yields too many results, decrease Sensitivity.
When a search yields no results, increase Blurring;4.3 Internal / External Weight Cut
When a search yields too many results, decrease Blurring.
To list only those retrieved images with weights greater than a certain value, you can set the "External Weight Cut" or "Internal Weight Cut".4.5 Click the �NeuralNet/1:N Search� command.
Step 5. Results.
See the results in the web page. You might need to click the "Refresh" button. The results are not sorted. If you want to sort the results, click the �NeuralNet/Sort� command.Finally, if you want to save the search results, click the �Batch/Save� command; the batch file will be generated in the text area and saved into a file. You can save up to 5 batch files by selecting 1 of 5 files to save. To recall a file, use a �Batch/Open� commands. If you want to save the code to your own file, highlight the code, hit "Ctrl/C", then go to Window's notepad and hit "Ctrl/V" to generate the batch file.
12.5
ImageFinder Operations for Short-Search (Advanced)
For the advanced users, there are additional options to increase the matching accuracy. This section adds more options to the last section.
Step 0 Preprocessing
To make the optimal selection, you can experiment with different combinations of Edge Filters and Threshold Filters.
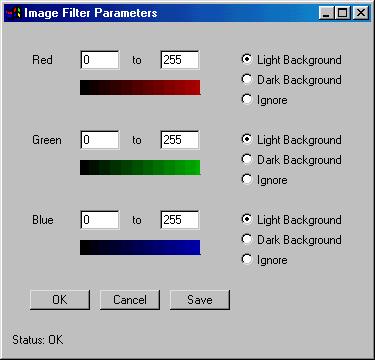
Figure 12.2 Nine Filter Parameters.
There are two special Threshold Filters: �Average� and �Customized�. These Threshold Filters provide you more control of the image preprocessing before the images enter the NeuralNet Filter. Each color has 3 variables: 2 variables for range and 1 variable for type. The 9 Filter Variables are:Red Range: [r1, r2];
Red Type: Light Background /Dark Background / Ignore;
Green Range: [g1, g2];
Green Type: Light Background /Dark Background/ Ignore;
Blue Range: [b1, b2];
Blue Type: Light Background /Dark Background/ Ignore.After setting the variables, click the Save button, and go back to the ImageFinder to see the training image. If the background filter is not satisfied, set the parameters again and click the Save button.
To explain what these filters are, we have to dig into technical details, which is beyond the scope of this menu. We encourage you to experiment: select a key image and try each filter.
Step 2. Training.
Set Translation TypeStep 3. NA
Set Rotation Type
Set Scaling Type
Set Border Cut
Step 4. Search.
Set Image Type
"Bi-level 1" (Integration) search will produce a higher weight than a "Bi-level 2" (Maximum) search. Similarly, a "Color 1" search will produce a higher weight than a "Color 2" search.Set Large/Small Size
To search large segments, use "L Segment" (Large Segment).
To search small segments, use "S Segment" (Small Segment).
Step 5. Results.
Select text or html output.
The images used in this example are from:
FY 1999 USPTO Annual Report,
http://www.uspto.gov/web/offices/com/annual/1999/
In this section, we will identify 5 trademarks. In particular, we will
try to demonstrate the symmetry parameter of the NeuralNet Filter. Symmetry
means objects in images have been changed, such as moved to a different
place (Translation Symmetry), or enlarged (Scaling Symmetry), or rotated
(Rotation Symmetry). The first two examples demonstrate Rotation symmetry,
the next two examples demonstrate Scaling symmetry, and the last example
demonstrates combined Rotation and Scaling symmetries. All examples have
Translation symmetry.
12.6.1 United Way - Rotation Symmetry


There are two ways to run this example:
- Batch
- Manual
Click �Example/Neural Net/United Way - R�
Click �Batch/Run�.
The Manual Run requires a few more clicks:
Input:
Training: .\uspto\image036.jpgParameters
Search: .\uspto\
Edge Filter: NoneOperation
Threshold Filter: Light Background 192
NeuralNet Filter:
Symmetry: Rotation Symmetry
Blurring = 18
Sensitivity = 25
Internal Cut = 40
- Click the �Key Segment� button and select �.\uspto\image036.jpg�;
- Click �Search Dir� button and select �.\uspto\�;
- Set the Threshold Filter to Light Background 192;
- Click the NeuralNet Filter Parameter button and set:
- Click �NeuralNet/Train� button to train the filter;
- Click �NeuralNet/1:N Search� button to make a search;
- The result is in a web page;
- If you want to sort, click the �Sort� button.
- Symmetry: Rotation Symmetry
Blurring = 18
Sensitivity = 25
Internal Cut = 40
I036_r10.jpg 104064
I036_r20.jpg 85824
I036_r30.jpg 115328
I036_r40.jpg 77632
I036_r50.jpg 70208
I036_r60.jpg 96384
I036_r70.jpg 98176
I036_r80.jpg 109312
I036_r90.jpg 91520
IMAGE036.JPG 128000000
Summary
# Images = 126
# To be Retrieved = 10
# Retrieved Correctly = 10
# Missed = 0
Hit Ratio = 100%Here Hit Ratio is the number of correctly retrieved images divided by the number of retrieved images. In this particular case, Hit Ratio = 100% = 10/10.
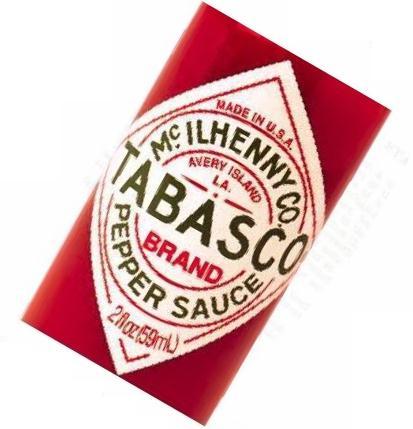
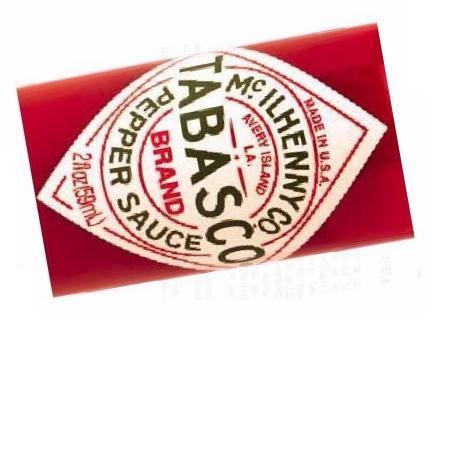
12.6.2
Tabasco - Rotation Symmetry
There are two ways to run this example:
- Batch
- Manual
Click �Example/Neural Net/Tabasco - R�
Click �Batch/Run�.
The Manual Run requires a few more clicks:
Input:
Training: .\uspto\image026.jpg
Search: .\uspto\
Parameters
Edge Filter: Sobel 1;
Threshold Filter: Dark 128;
NeuralNet Filter Parameter:
Symmetry = Rotation
Blurring = 30
Sensitivity = 80
Internal Cut = 50
ExternalCut = 60000
Operation
- Click the �Key Segment� button and select �.\uspto\image036.jpg�;
- Click �Search Dir� button and select �.\uspto\�;
- Set parameters as specified above;
- Click �NeuralNet/Train� button to train the filter;
- Click �NeuralNet/1:N Search� button to make a search;
- The result is in a web page;
- If you want to sort, click the �Sort� button.
I026_r10.jpg 78848
I026_r20.jpg 72832
I026_r30.jpg 71104
I026_r40.jpg 70016
I026_r50.jpg 72192
I026_r60.jpg 68992
I026_r70.jpg 69120
I026_r80.jpg 75072
I026_r90.jpg 102976
IMAGE026.JPG 128000000
Summary
# Images = 12612.6.3 Mr. Potato - Scaling Symmetry
# To be Retrieved = 10
# Retrieved Correctly = 10
# Missed = 0
Hit Ratio = 100%


There are two ways to run this example:
- Batch
- Manual
Click �Example/Neural Net/ Mr.Potato -S�
Click �Batch/Run�.
The Manual Run requires a few more clicks:
Input:
Training: .\uspto\image043.jpg
Search: .\uspto\
Parameters
Threshold Filter: Light Background 192
NeuralNet Filter Parameters:
Scaling Symmetry
Blurring = 9
Sensitivity = 18
InternalCut = 50 %
ExternalCut = 100000
Results
i042_s110.jpg 120128
i042_s120.jpg 3375000
i042_s130.jpg 114496
i042_s140.jpg 102976
I042_S50.JPG 123712
I042_S60.JPG 408000
I042_S70.JPG 609375
I042_S80.JPG 126784
I042_S90.JPG 122176
IMAGE038.JPG 106880
IMAGE042.JPG 128000000
Summary
# Images = 126
# To be Retrieved = 10
# Retrieved = 11
# Retrieved Correctly = 10
# Missed = 0
Hit Ratio = 10/11
12.6.4
Monopoly - Scaling Symmetry


There are two ways to run this example:
- Batch
- Manual
Click �Example/Neural Net/Manopoly -S�
Click �Batch/Run�.
The Manual Run requires a few more clicks:
Input:
Training: .\uspto\image046.jpg
Search: .\uspto\
Parameters
Reduction Filter: Int/Max
NeuralNet Filter Parameter:
Blurring = 3
Sensitivity = 23
Image Type = Color 2
Internal Cut = 40
External Cut = 1000
Results
I46_S105.JPG 1220
I46_S110.JPG 1220
I46_S115.JPG 1182
I46_S120.JPG 1104
I46_S80.JPG 2042
I46_S85.JPG 1080
I46_S90.JPG 1041
I46_S95.JPG 1563
IMAGE046.JPG 1280000000
Summary
# Images = 126
# To be Retrieved = 9
# Retrieved Correctly = 9
# Missed = 0
Hit ratio = 100%
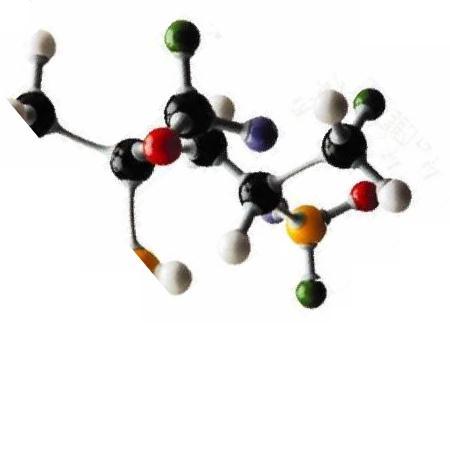
There are two ways to run this example:
- Batch
- Manual
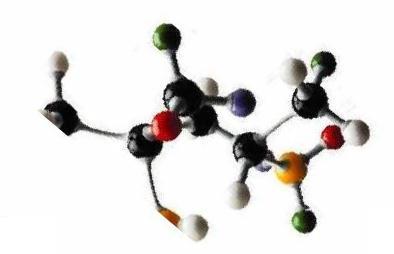
Click �Example/Neural Net/ Compound - RS�
Click �Batch/Run�.
The Manual Run requires a few more clicks:
Input:
Training: .\uspto\i82_s80.jpg
Search: .\uspto\
Parameters
Threshold Filter: Light Background 192
Reduction Filter: Int/Max
NeuralNet Filter Parameters:
Blurring = 25
Sensitivity = 22
Symmetry = Rotation
InternalCut = 25 %
ExternalCut = 80000
Results
56_90_25.JPG 80384
82_110_300.jpg 81280
82_110_320.jpg 82688
82_110_340.jpg 80320
82_80_40.JPG 84032
82_80_50.JPG 80640
82_80_60.JPG 86400
82_90_110.jpg 108288
82_90_120.jpg 103616
82_90_130.jpg 97664
I042_S70.JPG 92992
I82_S110.JPG 88384
I82_S80.JPG 128000000
I82_S90.JPG 112320
image004_t1.jpg 91456
image004_t4.jpg 92352
IMAGE038.JPG 82880
IMAGE082.JPG 89024
IMAGE104.JPG 81344
Summary
# Images = 12612.7 Stamp Recognition
# To be Retrieved = 13
# Retrieved Correctly = 13
# Missed = 0
Hit Ratio = 13/19
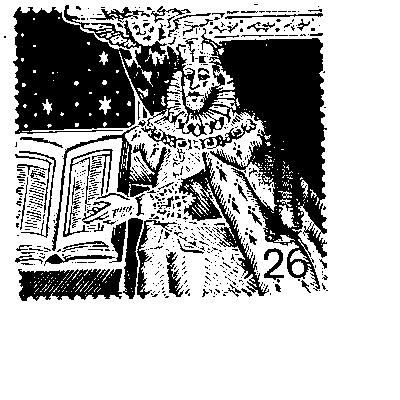
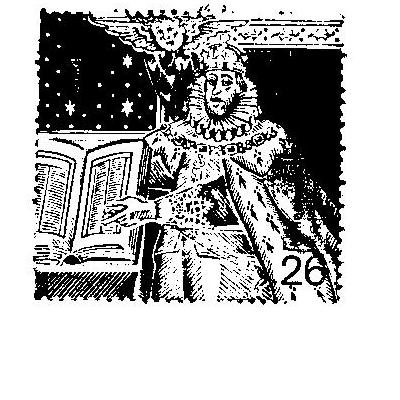
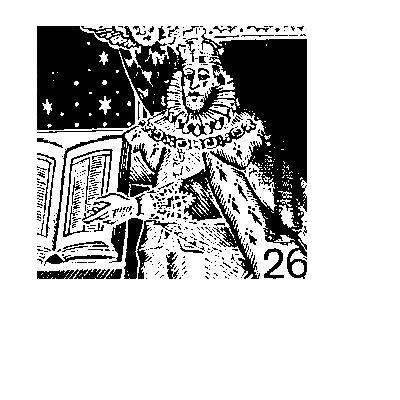
The images used in this section are in the directory �.\stamp\�. In
this section, we try to identify 2 stamps. Rather than use an existing
image to search, we will focus on building a sample image for matching.
The first example retrieves images like the following:
We will build a sample image as follows:
There are two ways to run this example:
- Batch
- Manual
Click �Example/Neural Net/Stamp 1�
Click �Batch/Run�.
The Manual Run requires a few more clicks:
Input:
Training: .\stamp\class1.jpg
Search: .\stamp\
Parameters
NeuralNet Filter Parameters:
Blurring = 8
Sensitivity = 45
InternalCut = 40 %
Results
CLASS1_4.JPG 46208
CLASS1_1.JPG 41344
class1_10.jpg 15488
CLASS1_2.JPG 45120
CLASS1_3.JPG 16896
CLASS1.JPG 128000000
CLASS1_5.JPG 56064
CLASS1_6.JPG 45568
CLASS1_7.JPG 41984
CLASS1_8.JPG 46336
CLASS1_9.JPG 30400
Summary
# Images = 10412.7.2 Example 2
# To be Retrieved = 11
# Retrieved Correctly = 11
# Missed = 0
Hit Ratio = 100%
The second example retrieves images like the following:
We will build a sample image as follows:
There are two ways to run this example:
- Batch
- Manual
Click �Example/Neural Net/Stamp 2�
Click �Batch/Run�.
The Manual Run requires a few more clicks:
Input:
Training: .\stamp\class7.jpg
Search: .\stamp\
Parameters
NeuralNet Filter Parameters:
Blurring = 9
Sensitivity = 40
InternalCut = 70 %
Results
CLASS7.JPG 128000000
CLASS7_1.JPG 62144
class7_10.jpg 36480
CLASS7_2.JPG 31360
CLASS7_3.JPG 27328
CLASS7_4.JPG 34560
CLASS7_5.JPG 27136
CLASS7_6.JPG 30720
CLASS7_7.JPG 56448
CLASS7_8.JPG 40704
CLASS7_9.JPG 47744
Summary
# Images = 104
# To be Retrieved = 11
# Retrieved Correctly = 11
# Missed = 0
Hit Ratio = 100%