10. Parameters
10.1 Overview
10.2 Filter Parameters
10.3 Image Processing10.3.1 Edge Filters10.4 Normalization Filter
10.3.2 Threshold Filters
10.3.3 Clean Up Filters
10.3.4 Starting the Selection10.4.1 Reduction Filters10.5 BioFilter
10.4.2 Parameters
10.6 Neural Filters
10.7 NeuralNet Filter10.7.1 Symmetry
10.7.2 Translation Type
10.7.3 Scaling Type
10.7.4 Rotation Type
10.7.5 Area of Interest (AOI)
10.7.6 Blurring
10.7.7 Sensitivity
10.7.8 Internal/External Weight Cut
10.7.9 L/S Segments
10.7.10 Image Type
10.7.11 Output
10.7.12 Segment
10.7.13 Bypass
10.7.14 Summary
Chapters 3, 4, and 5 study the customized software. Chapters 7, 8 and 9 provide test-driving of the ImageFinder. This chapter studies the ImageFinder parameters.
Attrasoft ImageFinder looks at a sample jpg or gif images and then looks for similar images from a directory or file. The similar images are defined as images containing the sample segments, or:
- Translated segments;
- Rotated segments;
- Scaled segments;
- Rotated and Scaled segments;
- Brighter or Darker segments.
- "Search-Directory" refers to a directory containing images to be searched.
- "Search-File" refers to a file containing images to be searched.
- Keys are images or image segments used to tell the software what to look for.
- Training or Retraining refers to teaching the software which images to look for. Training will first delete all old training and start to train the software from the beginning, while retraining will maintain all old keys.
To match an image, the ImageFinder pushes the image through many filters. For example, a set of filters could be:
Image Preprocessing
Edge Filters;Normalization
Threshold Filters; and
Clean Up Filter.
Reduction Filter.Feature Recognition
BioFilter;Pixel Level Recognition
Neural Filter.
NeuralNet Filter or ABM Filter.Multi-Layered Pixel Recognition
BioFilter 2;Both image processing filters and normalization filters are preprocessing filters. The rest of the filters are recognition filters. Each recognition filter, in turn, will have two main clicks:
NeuralFilter 2;
ABM Filter 2.
- Training; and
- Matching.
Many parameters and options of the ImageFinder are hidden. The users have only limited control of the parameters. Still, the ImageFinder has many parameters which can be adjusted by users. (The ImageFinder has 3000 parameters, of which the users can control approximately 70 in this version). In a typical search, you will set these parameters and leave the other parameters with default values.
There are 10 types of filters in this ImageFinder version:
Edge Filters;Each type has many selections. For example,
Threshold Filters;
Clean Up Filters;
Reduction Filters;
BioFilter;
NeuralFilter.
ABM Filter;
BioFilter 2;
NeuralFilter 2;
ABM Filter 2.
Type = Edge Filter;Another example is:
Selection = Sobel filter.
Type = Edge Filter;Each selection will have many parameters. The Main Problem is to select a set of parameters, which fits your specific problem.
Selection = Laplace Filter.
The procedure is:
1. For each of the following types:
Edge Filters;select a filter.
Threshold Filters;
Clean Up Filter;
Reduction Filter;
BioFilter;
NeuralFilter;
ABM Filter;
BioFilter 2;
NeuralFilter 2;
ABM Filter 2;
2. For the selected filter, specify the relevant parameters.
The ImageFinder has a large number of parameters. This version only exposes approximately 70 parameters. Specifying a particular set of parameters for a given problem is Attrasoft's expertise. We are going to address each type of filter in this chapter.
Image Processing can make it or break it.
For many problems like finger prints, palm prints,
, special image
processing filters will be required.
Attrasoft ImageFinder learns an image in a way similar to human eyes:
- Ignore the background;
- Focus on an object in the image.
The main focus of choosing image processing filters is to make the sample object(s) stand out, otherwise, change the options.
If the image processing filters in the off-the-shelf ImageFinder are not sufficent, a customized filter has to be built. Do not make too many things stand out, i.e. as long as the area of interest stands out, the rest should show as little as possible.
The Image Pre-Processing Layer consists of three types of filters:
Edge Filters;The ImageFinder applies these three filters in the above order.
Threshold Filters; and
Clean Up Filters.
The Edge Filters attempt to exaggerate the main feature(s) a user is looking for.
The Threshold Filters attempt to suppress the background.
The Clean-Up Filters will smooth the resulting image to reduce recognition error.
Each type of filter offers many selections, which we will study next. These three types of filters do not have parameters.

Figure 10.1 ImageFinder.
To select an Edge Filter, click the Edge Filter Drop Down List,
which is the first List.
To select a Threshold Filter, click the Threshold Filter Drop
Down List, which is the second List.
To select a Clean Up Filter, click the Clean Up Filter Drop
Down List, which is the third List.
Edge Filters extract and enhance edges & contours in an image by expressing intensity differences (gradients) between neighboring pixels as an intensity value. The basic variables are the differences between the top and bottom rows; the differences between the left and right columns; and the differences between the center point and its neighbors.
Edge Filters have the following selections:
Code
Meaning
0
No Edge Filter
1
Sobel 1 (Prewitt)
2
Sobel 2 (Sobel)
3
Sobel 3
4
Sobel 4
5
Gradient
6
Gradient, 45°
7
Sobel 1, 45°
8
Sobel 1, - 45°
9
Laplacian 4
10
CD 11
11
FD 11
12
FD 9
13
FD 7
14
Laplacian 5
15
Laplacian 8
16
Laplacian 9
17
Laplacian 16
18
Laplacian17
All other filters have to be ordered in a Customized Version. These names really do not make any sense to common users; the best way to figure out what these filters are is to select a training image and try each of the filters. In general, these filters require the Dark Background 128 Threshold Filter.
If you do not want to know the details, please skip the rest of this section. The details will be given below so you will know how to order a customized filter:
Sobel 1:
-1 0 1 -1 -1 -1
-1 0 1 0 0
0
-1 0 1 1 1
1
Sobel 2:
-1 0 1 -1 -2 -1
-2 0 2 0 0
0
-1 0 1 1 2
1
Sobel 3:
-1 0 1 -1 -3 -1
-3 0 3 0 0
0
-1 0 1 1 3
1
Sobel 4:
-1 0 1 -1 -4 -1
-4 0 4 0 0
0
-1 0 1 1 4
1
Gradient:
0 0 0 0 -1
0
-1 0 1 0 0
0
0 0 0 0 1
0
Gradient, 45°
0 0 1 -1 0 0
0 0 0 0 0
0
-1 0 0 0 0
1
Sobel 1, 45°
0 1 1 1 1
0
-1 0 1 1 0
-1
-1 -1 0 0 -1 -1
Sobel 2, 45°
0 1 2 2 1
0
-1 0 1 1 0
-1
-2 -1 0 0 -1 -2
Laplacian 4
0 -1 0
-1 4 -1
0 -1 0
Laplacian 5
0 -1 0
-1 5 -1
0 -1 0
Laplacian 8
-1 -1 -1
-1 8 -1
-1 -1 -1
Laplacian 9
-1 -1 -1
-1 9 -1
-1 -1 -1
Laplacian 16
0 0 -1 0
0
0 -1 -2 -1 0
-1 -2 16 -2 -1
0 -1 -2 -1 0
0 0 -1 0
0
Laplacian 17
0 0 -1 0
0
0 -1 -2 -1 0
-1 -2 17 -2 -1
0 -1 -2 -1 0
0 0 -1 0
0
After Edge Filters, the Threshold Filter will be applied to images. Choose these two filters where the sample objects stand out, otherwise change the filters. If no filter in this version fits your problem, a Customized Filter has to be built. DO NOT make too many things stand out, i.e. as long as the area of interest stands out, the rest should show as little as possible.
Once you make a selection, the objects in the images are black and the
background is white (like a book, white paper, black print). You should
make the black area as small as possible, as long as it covers the key-segment(s).
Otherwise, switch to a different background.
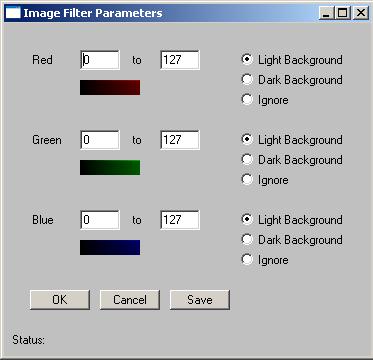
Figure 10.2 Threshold Filter Parameters.
There are 30 Threshold Filters in the ImageFinder. A few filters, including the average-filter and the customized-filter, allow you to specify any color range. Color is specified by three separate colors: Color = (red, green, blue). Each of the colors ranges from 0 to 255. (0, 0, 0) is black; (255, 255, 255) is white.
You should choose a filter where the sample object(s) stand out. You may want to know the meaning of the filters; example, "Light Background 128" means:
- RGB Average in 0 127 ==> objects; and
- RGB Average in 128 - 255 ==> background.
- Choose an Edge Filter and a Threshold Filter where the sample object(s) stand out;
- Choose an Edge Filter and a Threshold Filter where the black area is as small as possible, as long as it covers the key-segment(s).
Clean Up Filters will clear noise off the image, but it will take more computation time.
If you are not familiar with image processing, please try the following:
Setting 1:
Edge Filters: Sobel 1 (or Sobel 2)Setting 2:
Threshold Filters: Dark Background 128
Clean Up Filter: Medium.
Edge Filters: None (Enter An Edge Filter)
Threshold Filters: Light Background 128
Clean Up Filter: None (Enter A CleanUp Filter)
Beyond that, please use the trial and error approach to exaggerate
the main features you are looking for and to suppress the background.
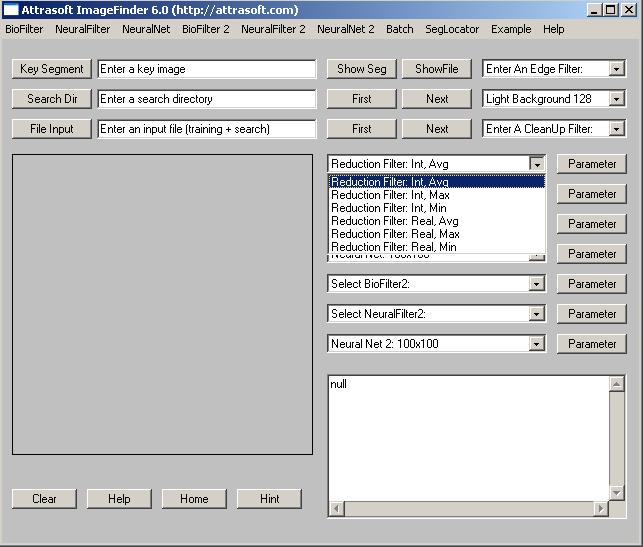
Figure 10.3 Selecting Reduction Filter.
The Normalization Layer connects the image to the underlying neural nets. This layer has one type of filter, the Reduction Filter.
Let the underlying neural net be 100x100: if an image is larger than 100x100, say 350x230, then this image will be reduced to 100x100 or smaller.
When reducing images, a scaling factor can be introduced easily. Although the scaling symmetry can compensate for this scaling factor, the scaling symmetry is computationally expensive.
It is important to know that the Reduction Filter will match the selected underlying neural net, therefore, the behavior of the Reduction Filter not only depends on the selection of this filter itself, but also depends on the NeuralNet Filter chosen.
There are several ways to reduce images:
Integer;Integer Reduction
Real; or
All images are reduced by the same amount.
Images are reduced by an integer factor to maximally fit 100x100 without distortion. For example, a 350x230 image will be reduced to 87x57.Real Reduction
Images are reduced by a real number to maximally fit 100x100 without distortion. For example, a 350x230 image will be reduced to 100x65.All
All training images and images in the search-directory are reduced by the same integer to fit 100x100 without distortion.
Assume a given image is scaled into several sizes, say 350x230,
450x292, and 550x358, then the Real Reduction will reduce all three to
a same size, 100x65.
When you choose "All"-reduction, all training images and images in the search-directory are reduced by the same integer. The software will open the training image and images in the search-directory to find the reduction factor, which will fit all images. If the image sizes vary significantly, (say some images are 100x100, and some images are 1000x1000), then the 1000x1000 image will be reduced to 100x100 and the 100x100 image will be reduced to 10x10. Reducing a 100x100 image to 10x10 can make image recognition difficult. Therefore in this case, this option can be used for searching the larger images (1000x1000), but not for the smaller images (100x100).
Within each type of reduction, there are 3 more settings. Assume a 3x3 pixel array is reduced to 1 pixel,
- Avg: Assign the average of the 3x3 pixels array to the new pixel;
- Max: Assign the maximum of the 3x3 pixels array to the new pixel; or
- Min: Assign the minimum of the 3x3 pixels array to the new pixel.
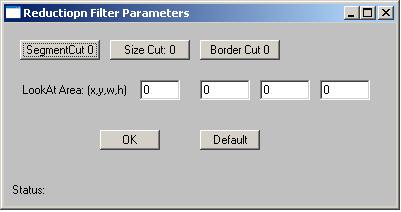
Figure 10.4 Reduction Filter Parameter.
The Reduction Filter has seven parameters. This section will explain these seven parameters. To set these parameters, click the Parameter button next to the Reduction filter; a new window will pop up. Set the parameters in this new window (See Figure. 10.4).
Segment Cut
This parameter deals with the edges of the segments in the images. The Segment Cut parameter ranges from 0 to 12. The larger this parameter is, the smaller the segment the ImageFinder will use.
The possible settings in the user interface are: 0, 1, 2, .., and 12. To set the parameter, keep clicking the button; the setting will switch from one to the next each time you click the Blurring button.
Size Cut
In some applications, the users only want to search images of certain dimensions and ignore other images. An example is given below:
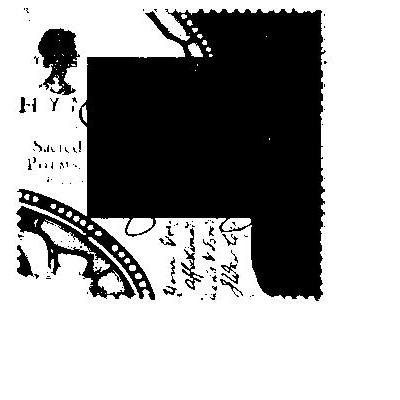
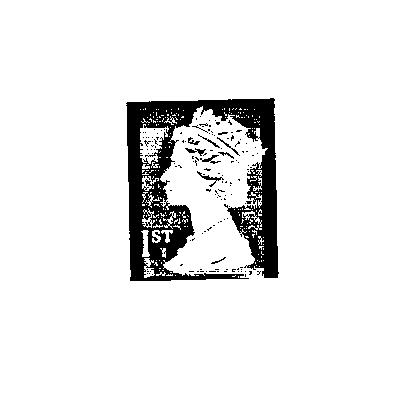
In this example, the two stamps belong to two different classes based on the image dimension alone.
The Size Cut parameter ranges from 0 to 9. To set the parameter, keep clicking the Size Cut button; the setting will switch from one to the next each time you click the button.
If the setting is 0, this parameter will be ignored. If the parameter is 1, then the longest edge of the image to be considered must be at least 100, but less than 199. If the parameter is 2, then the longest edge of the image to be considered must be at least 200, but less than 299;
Border Cut
The Border Cut parameter ranges from 0 (no cut) to 9 (18% border cut). For some images (see the picture below), you might want to get rid of the sections of images close to the borders. To get rid of the border section, use the Border Cut.

The possible settings in the user interface are: 0, 1, 2, .., and 9. Assume an image is (0,0; 1,1), setting Border Cut to 1 means the ImageFinder will look at the section (0.02, 0.02; 0.98, 0.98); setting Border Cut to 2 means the ImageFinder will look at the section (0.04, 0.04; 0.96, 0.96); . To set the parameter, keep clicking the button.
Look-At Area
The Look-At Area is the area the ImageFinder will use in a matching operation. A 100 x 100 window specifies a whole image. If an integer Reduction Filter is used, the actual area can be less than 100x100.
Four numbers specify the Look-At Area:
(x, y, w, h)
(x, y) are the coordinates of the upper-left corner and (w, h) are the width and height of the Look-At Window.
To use this Look-At Window, enter (x, y, w, h) to the 4 text boxes.
The image display area in the ImageFinder is 300x300; therefore,
the training segment is specified within a 300x300 area. The Look-At Window
is specified within a 100x100 area.
10.5 BioFilter
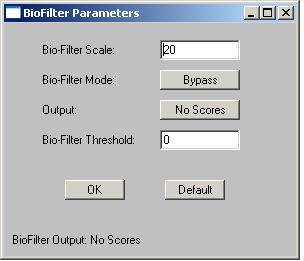
Figure 10.5 BioFilter Parameter.
BioFilter is used for a quick study of a test set of images. There are 11 BioFilters in this version. BioFilter will do the following:
- Converting one image in the Input Space to one record in the Feature Space;
- Feature Space Matching.
The BioFilter has four parameters. This section will explain these four parameters. To set these parameters, click the Parameter button next to the BioFilter; a new window will pop up. Set the parameters in this new window (See Figure. 10.5).
Bio-Filter Scale
Use this parameter to control the amount of output. This parameter ranges from 0 to 100. The larger this number is, the more matches you will get. To set this parameter, enter a number between 0 and 100 to the text box.
Bio-Filter Mode
Since BioFilter is one of the recognition filters, you may or may not use this filter. This parameter decides whether the BioFilter will be used by other filters.
This parameter has three values:
UntrainedThe Untrained setting will do an image matching without training. The Trained setting required the BioFilter be trained first. The Bypass setting will by pass this filter.
Trained
Bypass
For the BioFilter, training requires two files, a1.txt and match.txt:
- A1.txt is the record file, which contains many records. Each image is converted into a record. A record represents features of an image in a feature space.
- Match.txt is a list of matching pairs. This file will teach the ImageFinder who will match with whom.
Output
To determine if one image "matches" another image, they must be compared using a unique algorithm. Generally, the result of this comparison is a "score", indicating the degree to which a match exists. This score is then compared to a pre-set threshold to determine whether or not to declare a match.
The Output parameter has two settings:
No ScoresIf the BioFilter is an intermediate step, this score will not show up in the output file. The No Scores setting (default setting) will not show the scores in the output file. If the BioFilter is the only filter used in the matching, then you can show the score in the output file by selecting the Scores setting.
Scores
To set the parameter, keep clicking the button; the setting will switch from one to the next each time you click the Blurring button.
BioFilter Threshold
The result of image comparison is a "score", indicating the degree to which a match exists. This score is then compared to a pre-set Threshold to determine whether or not to declare a match. This parameter sets the threshold.
To decide what threshold to use, you should make a test run first and look at the scores. Matching images have higher scores; unmatched images have lower scores. Select a threshold to separate these two groups. There will be a few images in the middle, representing both groups. Under these circumstances, the threshold selection depends on your applications.
To set the Threshold parameter, enter a number into the Threshold text box.
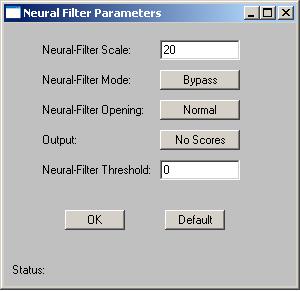
Figure 10.6 NeuralFilter Parameter.
Neural Filter is the main Feature Space Matching filter. There are 5 Neural Filters in this version. Neural Filter is very similar to the BioFilter in operation. Neural filter is more accurate than the BioFilter.
To select a Neural Filter, use the Neural Filter Drop Down List.
The Neural Filter has five parameters. This section will explain these five parameters. To set these parameters, click the Parameter button next to the Neural Filter; a new window will pop up. Set the parameters in this new window (See Figure. 10.6).
Neural-Filter Scale
Use this parameter to control the amount of output. This parameter ranges from 0 to 100. The larger this number is, the more matches you will get. To set this parameter, enter a number between 0 and 100 to the text box.
Neural-Filter Mode
Since Neural Filter is one of the recognition filters, you may or may not use this filter. This parameter decides whether the Neural Filter will be used by other filters.
This parameter has two values:
Trained
Bypass
The Trained setting requires the Neural Filter to be trained first,
before matching. The Bypass setting will bypass this filter by other
filters.
For the Neural Filter, training requires two files, a1.txt and match.txt:
- A1.txt is the record file, which contains many records. Each image is converted into a record. A record represents features of an image in a Feature Space.
- Match.txt is a list of matching pairs. This file will teach the ImageFinder who will match with whom.
Neural Filter Opening
This parameter controls the amount of the output. This parameter has 5 settings:
Very Large
Large
Normal
Small
Very Small
Large opening will allow more output than small opening. To set
the parameter, keep clicking the button; the setting will switch from one
to the next each time you click the Blurring button.
Output
To determine if one image "matches" another image, they must be compared using a unique algorithm. Generally, the result of this comparison is a "score", indicating the degree to which a match exists. This score is then compared to a pre-set threshold to determine whether or not to declare a match.
The Output parameter has two settings:
No ScoresIf the Neural Filter is an intermediate step, this score will not show in the output file. The No Scores setting (default setting) will not show the scores in the output file. If the Neural Filter is the final filter used in the matching, then you can show the score in the output file by selecting Scores.
Scores
To set the parameter, keep clicking the button; the setting will switch from one to the next each time you click the Blurring button.
Neural Threshold
The result of image comparison is a "score", indicating the degree to which a match exists. This score is then compared to a pre-set threshold to determine whether or not to declare a match. This parameter sets the threshold.
To decide what threshold to use, you should make a test run first and look at the scores. Matching images have higher scores; unmatched images have lower scores. Select a threshold to separate these two groups. There will be a few images in the middle, representing both groups. Under these circumstances, the threshold selection depends on your application.
To set the Threshold parameter, enter a number into the Threshold text box.
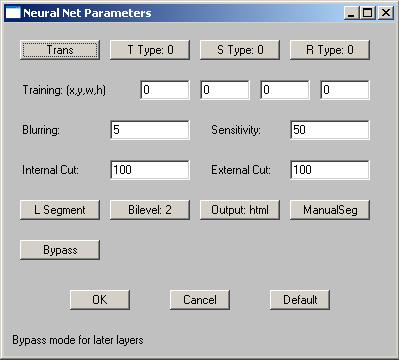
Figure 10.7 Neural Net Parameter.
If the Feature Space Recognition is not good enough, the ImageFinder will move into Input Space Recognition, which operates on image pixels. The NeuralNet Filter, or the ABM Filter is the Input Space matching filter.
There are 6 NeuralNet Filters in this version. To select a NeuralNet Filter, use the NeuralNet Filter Drop Down List.
The default setting is 100x100. The matching speed crucially depends on the NeuralNet filter chosen. For example, if the filter is changed to 50x50, then the underlying neural net size is reduced by a factor of 4; and the neural computation speed will be decreased by a factor of 16.
The available filters are:
- 100x100 (Most Accurate)
- 90x90
- 80x80
- 70x70
- 60x60
- 50x50 (Least Accurate)
- 90x90 filter is 1 times faster;
- 80x80 filter is 1.6 times faster;
- 70x70 filter is 2.7 times faster;
- 60x60 filter is 5 times faster; and
- 50x50 filter is 10 times faster.
In the following, we explain these parameters in the order as they appear in the parameter window (Figure 10.7).
The first row has four buttons, which will be described from subsection 1 to 4. The second row has 4 text boxes to specify training segment, which will be described in subsection 5. The third row has two text boxes, Blurring and Sensitivity, which will be explained in subsection 6 and 7. The fourth row has two text boxes, Internal and External Weight Cut, which will be explained in subsection 8. After that each subsection explains one parameter.
Symmetry or Invariance means similarity under certain types of changes. For example, considering two images, one with a face in the middle and the other with the face moved to the edge; we say these two images are similar because of the face.
Attrasoft ImageFinder can implement any symmetry (or combination of symmetries), which can be described by mathematics. However, symmetries are computationally expensive.
The symmetry defines "similar images". The Attrasoft ImageFinder supports five symmetry settings:
- No symmetry (0);
- Translation symmetry (3);
- Scaling symmetry (4);
- Rotation symmetry (5); and
- Rotation and Scaling symmetries (6).
- Intensity symmetry.
For example, it seems that Stamp-Recognition requires translation and
rotation symmetries. But because the edges of a stamp can be detected easily,
the stamp can be rotated and shifted to a fixed position where the horizontal
side is longer than the vertical side. All you need to do is recognize
a stamp or an upside-down stamp. Therefore, stamp-recognition does not
really require translation and rotation symmetries.
10.7.2 Translation Type
The Translation Type defines the accuracy of the translation symmetry. The Translation Type settings (and their codes) are:
- Most Accurate (0);
- Accurate (1); and
- Least Accurate (2).
The Scaling Type defines the accuracy of the scaling symmetry. The Scaling Type settings (and their codes) are:
- Least Accurate (0);
- Accurate (1);
- Accurate (2); and
- Most Accurate (3).
To set the Scaling Type, keep clicking the T Type button; the
setting will switch from one to the next each time you click the button.
The default setting is 0, the least accurate setting.
The Rotation Type defines the accuracy of the Rotation symmetry. The Rotation Type settings (and their codes) are:
- 360° rotation, least accurate (0);
- -5° to 5° rotation (1);
- -10° to 10° rotation (2);
- 360° rotation, accurate (3);
- 360° rotation, more accurate (4);
- 360° rotation, most accurate (5).
Selecting an image segment is very important for training. Use image segments for searching similar images. Only use the whole image for exact matches.
Training requires an "Area of Interest" (AOI) or "Set Focus", which selects a key-segment. If an AOI is not chosen, the whole image is the AOI. Four numbers specify AOI: the upper-left corner coordinates, and the length and width. Once the segment specification is successful, a black box will cover the selected area. When you look at the training image, if the selected area is not what you want, just re-select the area again. To select the training image, use the Key Segment button.
Four text boxes specify AOI: (x y w h), where (x, y) is the upper-left corner, w is width, and h is height. All images are scaled to 300x300 for presentation on the ImageFinder. The maximum AOI is (0, 0) to (300, 300). The default setting is the whole image; the code is (x y w h) = (0 0 0 0). (0000) means ignore segment.
There are two situations where you should create a new sample image
out of a sample segment:
- You repeatedly use an image segment;
- The image segment is not a rectangle; say a polygon.
The Windows Paint program will help you to create an image from
a segment. When you create an image segment, please do not change the
original image size. For example, if your image is 512x512 and you
want create a segment of 400x200, please paste the 400x200 segment into
a 512x512 empty image.
This is one of the most important search parameters and the first parameter you should adjust.
Blurring compensates for minor image changes, which are not visible to human eyes. For example, if you use software to compress an image, to change the intensity of an image, or to translate, scale, or rotate an image, the image will be distorted a bit at the pixel level. You have to set Blurringto compensate for this.
The Blurring setting ranges from 0 to 50. The default setting is 5. "0%"-Blurring means the exact match. When the "Blurring" is increased, you will get more and more similar images. As the Blurring goes higher, the speed will slow a bit.
To set Blurring, enter a number between 0 and 50 to the Blurring text box. You should set the parameters in the following order:
Blurring, Internal Weight Cut, Sensitivity, External Weight Cut.
To Summarize:
- When a search yields no results, increase Blurring;
- When a search yields too many results, decrease Blurring.
The Sensitivity parameter ranges from 0 (least sensitive) to 100 (most sensitive). To search small segment(s), use high sensitivity search. To search large segment(s), use low sensitivity search. The higher this parameter is, the more results you will get.
The Sensitivity parameter ranges from 0 to 100. The default is 50.
To set the Sensitivity, enter a number between 0 and 100 to the Sensitivity text box. The Sensitivity parameter controls the number of similar images retrieved by the ImageFinder.
To Summarize:
- When a search yields no results, increase Sensitivity;
- When a search yields too much result, decrease Sensitivity.
10.7.8
Internal/External Weight Cut
You can set the "Internal Weight Cut" (Internal Cut) or "External Weight Cut" (External Cut) to list only those retrieved images with scores or weight greater than a certain value (called threshold).
It is better to give no answer than a wrong answer. Assume you are searching images and all similar images have weights ranging from 1,000 to 10,000. It is possible that some other images pop up with weights ranging from 10 to 100. To eliminate these images, you can set the External Weight Cut to 1,000.
The Internal Cut plays a similar role as the External Cut. There are two differences between these two cuts:
- The Internal Cut ranges from 0 to 99; the External Cut can be any number;
- The Internal Cut stops the images from coming out, whereas the External Cut can bring the eliminated images back if you set the External Cut to 0. You might need to see the eliminated images sometimes for the purpose of adjusting parameters.
To Summarize, set the Internal Cut or External Cut to eliminate errors.
The ImageFinder is currently tuned to search for large image segments (size of the whole image). It can look for small segments via "Small Segment" setting; however, only translation symmetry is supported for small segments. A Customized Version can be ordered for other symmetries.
To search large segments, use "L Segment" (Large Segment). To search small segments, use "S Segment" (Small Segment). For example, if a sample segment is one quarter of the sample image, it is a large segment. If the segment is 1/20 of the sample image, it is a small segment.
Currently, "S Segment" only supports translation symmetry. If you need rotation or/and scaling symmetry, please use "L Segment". Other symmetries can be added in a Customized Version.
To set the Large/Small Segment, keep clicking the Large or Small button; the setting will switch from one to the next each time you click the button.
There are BW and Color images. For each of them, there are sum-search, maximum-search, and average-search. This generates 6 image types:
- Bi-level 1 (0)
- Bi-level 2 (1)
- Bi-level 3 (2)
- Color 1 (3)
- Color 2 (4)
- Color 3 (5)
"Bi-level 1 is like an integration of function f (x); "Bi-level
2 is like a maximum value of f (x); and "Bi-level 3 is the average of
the above two.
"Bi-level 1" search will produce a higher weight than a "Bi-level 2" search. "Bi-level 3" search is in the middle. Similarly, a "Color 1" search will produce a higher weight than a "Color 2" search. "Color 3" is in the middle
To set the image type, keep clicking the Image Type button; the setting will switch from one to the next each time you click the Image Type button.
The output can be a text file and html page. If this is an intermediate step, the output is usually a text page.
To set the output type, keep clicking the Output button; the setting
will switch from one to the next each time you click the button.
The training segment can be specified in two ways:
Manual Specification
Automatic Specification
The default is Manual Specification. In this setting the segment
will be specified by the four text boxes (x, y, w, h), as we discussed
earlier.
Use image segments for searching similar images. Only use the whole image for exact matches. In general, the training segment is used rather than the whole image.
If you do not want to pick up a training segment, then let the ImageFinder pick up the segment for you by using the Automatic Specification. This parameter has 4 settings:
ManualSegIf the AutoSeg 10 setting does not yield enough results, use AutoSeg 20. If the AutoSeg 20 setting does not yield enough results, use AutoSeg 30. The reverse is also true. If the AutoSeg 30 setting yields too many results, use AutoSeg 20 or AutoSeg 10.
AutoSeg 10
AutoSeg 20
AutoSeg 30
Since NeuralNet Filter is one of the recognition filters, you may or may not use this filter. This parameter decides whether the NeuralNet Filter will be used.
This parameter has two values:
Trained
Bypass
To set the Bypass, keep clicking the button; the setting will switch from one to the next each time you click the button.
The NeuralNet Filter is hard to use because it has so many parameters. Not all parameters are equal. We divide the parameters into two groups. The beginners should use only parameters in the first group. Note that:
- The most important parameters for Training are Image Processing, AOI, Symmetry, and Segment Cut.
- The most important parameters for Matching are Blurring, and Sensitivity.
- Some parameters, like Segment Cut, will be used in both.
Training (3 parameters):
- Segment: selecting AutoSeg 10 so the ImageFinder will select a training segment for you at the beginning.
- Symmetries
- Segment Cut
- Sensitivity
- Blurring
- External Weight Cut
- Internal Weight Cut
Training (7 parameters):
- Area of Interest (AOI): (x, y, w, h)
- Translation Type
- Scaling Type
- Rotation Type
- Image Type
- Image Dimension
- Search Segment Size
You can set the Segment button (Default setting is ManualSeg) to AutoSeg 10 to avoid choosing these 4 parameters.
Besides the above parameters, image-processing filters are also very important to training and matching.
If each parameter has 2 choices, 10 parameters together will have 1,000
settings; 20 parameters together will have 1,000,000 settings. Therefore,
it is important to know how to use the software in order to get the desired
results. By focusing only on 7 parameters, you can significantly reduce
the complexity of operating this software.