Attrasoft
ImageFinderSeg searches for a cropped image segment
from a folder in three clicks.
Attrasoft. Inc.
P. O. Box
13051
Savannah,
GA, 31406
USA
Order: http://attrasoft.com
Install the Software
The deliverable is either a CD or a zip file downloaded
from a web address. To install the software from a CD:
·
Copy
CD:\IfSeg2013\ to a folder, say C:\IfSeg2013\;
·
Click
“ImageFinderSeg.exe” in the folder to run.
To install
the software from a downloaded zip file:
·
Unzip
IfSeg2013.zip to a folder, say C:\IfSeg2013\;
·
Click
“ImageFinderSeg.exe” in the folder to run.
The
software requires an updated Windows to run.
Statement of Copyright Restriction
The Attrasoft program that you
purchased is copyrighted by Attrasoft, and your rights of ownership are subject
to the limitations and restrictions imposed by the copyright laws outlined
below.
It is against the law to copy,
reproduce, or transmit (including, without limitation, electronic transmission
over any network) any part of the program except as permitted by the copyright
act of the United States (title 17, United States code). However, you are
permitted by law to write the contents of the program into the Machine memory
of your computer so that the program may be executed. You are also permitted by
law to make a back-up copy of the program subject to the following
restrictions:
·
Each
back-up copy must be treated in the same way as the original copy purchased
from Attrasoft;
·
No
copy (original, or back-up) may be used while another copy, (original, or
back-up) is in use;
·
If
you ever sell or give away the original copy of the program, all back-up copies
must also be given to the same person, or destroyed.
In addition, this software is for
the personal use only. This is defined as follows:
·
You
cannot sell a service based on any computation results produced by this
software. You must purchase a separate annual license for commercial use from
Attrasoft.
·
You
cannot use the software to perform work for which you will get paid. You must
purchase a separate annual license for business use from Attrasoft.
This User’s Guide and Reference Manual is copyrighted by Attrasoft.
© 2008 – 2013
Software Restrictions
To improve performance, the off-the-shelf Attrasoft ImageFinderSeg searches
for a cropped image segment from a folder of images with the following
restrictions:
·
Scale variations start from 20%: The
cropped images and their appearances in the original images must be at least
20% in each direction.
·
No rotation variations: The cropped
images and their appearances in the original images must have the same
direction.
Table of Contents
Statement
of Copyright Restriction
3.1 Types of License, Software Limits, and
Support
3.2 Customized Software and Services
1. Introduction
Attrasoft
ImageFinderSeg (Figure 1) searches for a cropped image
segment from a folder in three clicks:
·
Select a “Key image” by dragging and
dropping;
·
Select a folder by dragging and
dropping;
·
Search a folder for image segments that
match the key image by clicking a menu item.
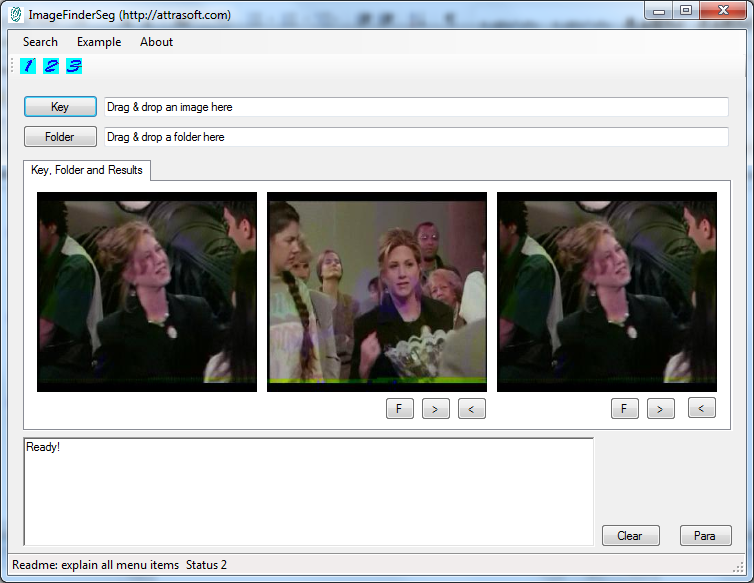
Figure 1. ImageFinderSeg.
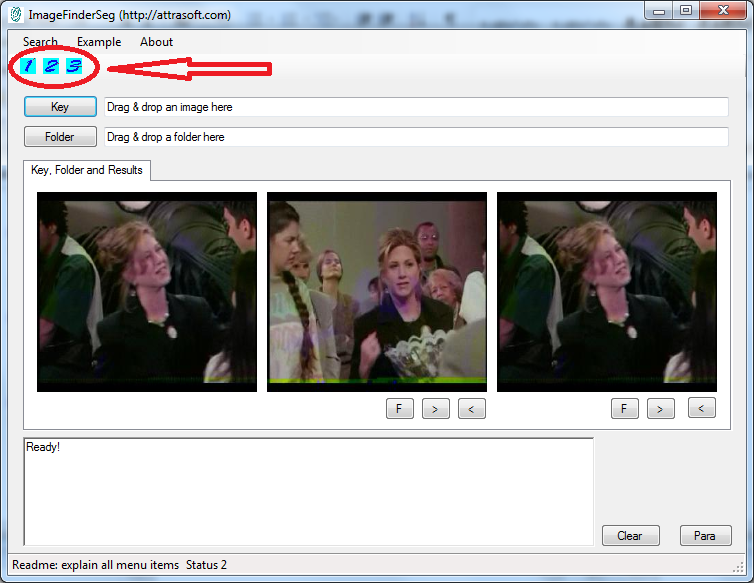
Figure 2. Toolbar.
These three steps are implemented by
three buttons in the toolbar (Figure 2). You can operate the Attrasoft ImageFinderSeg from the
Toolbar (Figure 2) alone.
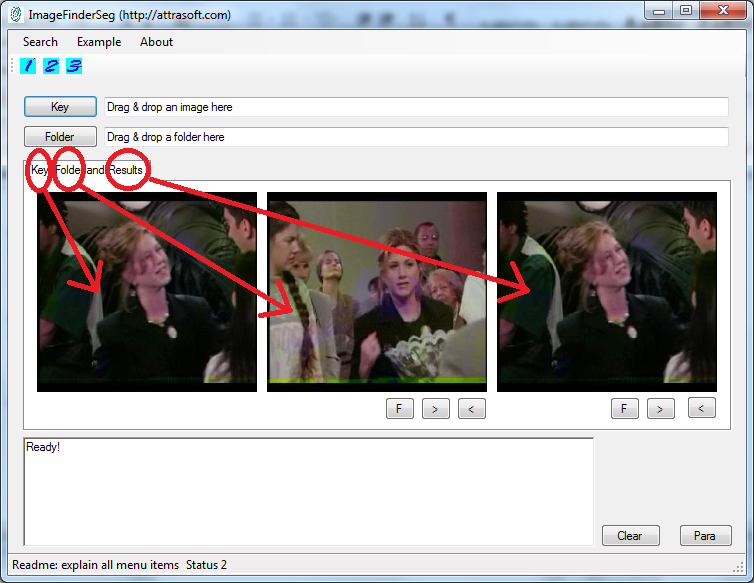
Figure 3. Three image Panels: Key, Folder,
and Results.
The ImageFinderSeg
has three image panels (Figure 3):
·
Key
Panel;
·
Folder
Panel; and
·
Results
Panel.
Key
A key is a cropped image segment to
be searched. To obtain a key, you can cut out an image segment from an image by
using Windows Paint. Figure 4 shows an example of how to obtain a key segment
from an image by using Windows’s Paint.
Folder
A folder is a collection of
previously stored images in a folder. Use the F, >, and < buttons in
Figure 5 to see the images in the folder. The “F” button goes to the first
image; the “>” button goes to the next image; and the “<” goes to the
previous image. All sub-folders will be included.
Results
Results are images that matched the
“key” image segment. Use the F, >, and < buttons in Figure 5 to see
matched images. The “F” button goes to the first image; the “>” button goes
to the next image; and the “<” goes to the previous image.

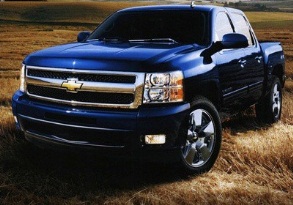
Figure 4. Obtaining a cropped
key segment from an image by using Windows’s Paint.
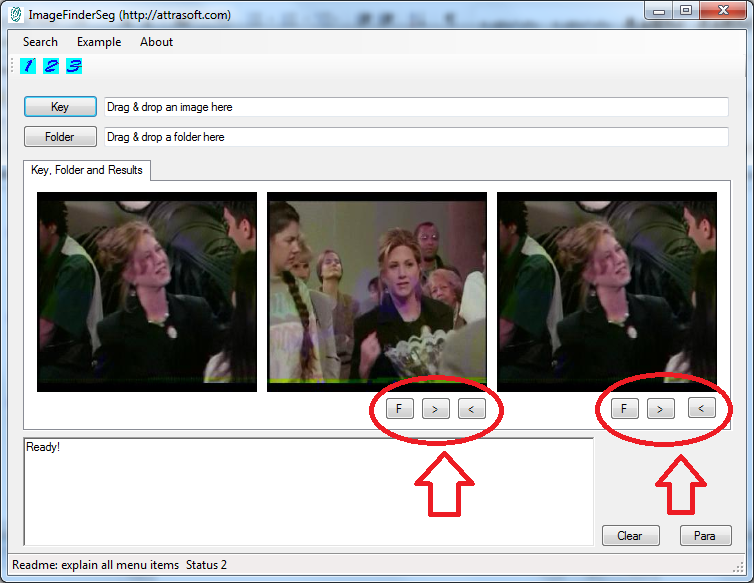
Figure 5. Use the F, >, and < buttons to
see the images in the folder and Results. The “F” button goes to the first
image; the “>” button goes to the next image; and the “<” goes to the
previous image.
To search for an image segment in a
folder in your computer:
1.
Select
a Key (Drag & drop an image to the first text box);
2.
Select
a folder (Drag & drop a folder to the second text box);
3. Search (click the “3” button in the Toolbar, or
menu items under menu “Search”).
Step 3, Search, can take some time.
To see the results:
1. Click the “F” button in Results
Panel (see Figure 5);
2. Click the “>” button in
Results Panel (see Figure 5).
Step 3, Search, can take some time.
Attrasoft
ImageFinderSeg searches for a cropped image segment
from a folder of images with the following restrictions to improve performance:
·
Scale invariance start from 20%: The
cropped images and their appearances in the original images must be at least
20% in each direction.
·
No rotation invariance: The cropped
images and their appearances in the original images must have the same
direction.
In the following chapters, we assume
you will install the software to:
C:\IfSeg2013\.
If
not, simply substitute this folder with your folder.
2. How to Use ImageFinderSeg
The
deliverable is either a CD or a zip file downloaded from a web address. To
install the software from a CD:
·
Copy CD:\IfSeg2013\ to a folder, say
C:\IfSeg2013\;
·
Click “ImageFinderSeg.exe” in the
folder to run.
To install the software from a downloaded zip
file:
·
Unzip IfSeg2013.zip to a folder, say
C:\IfSeg2013\;
·
Click “ImageFinderSeg.exe” in the
folder to run.
The software requires an updated
Windows to run.
To search for an image segment in a
folder in your computer:
1.
Select
a Key
Step 1, selecting a Key, can be
completed by dragging & dropping an image to the first text box;
2.
Select
a folder
Step 2,
select a folder, which can be completed by dragging & dropping a folder to
the second text box;
3.
Search
Step 3, Search, can be completed by
the Search menu in Figure 5.
To see the results:
1. Click the Results “F” button
(Figure 5);
2. Click the Results “>” button
(Figure 5).
2.1 Learn by Example
Figure 6.
1:1 Matching.
The first example (see Figure 6) is to match the key,
C:\IfSeg2013\
ex_object1\key.jpg,
against
the image,
C:\IfSeg2013\
ex_object1\CIMG4643_mid_shelf1.JPG.
The example will take three clicks:
1.
Drag
& drop an image (see Figure 7).
Drag
& drop C:\IfSeg2013\ ex_object1\key.jpg to the first text
box.
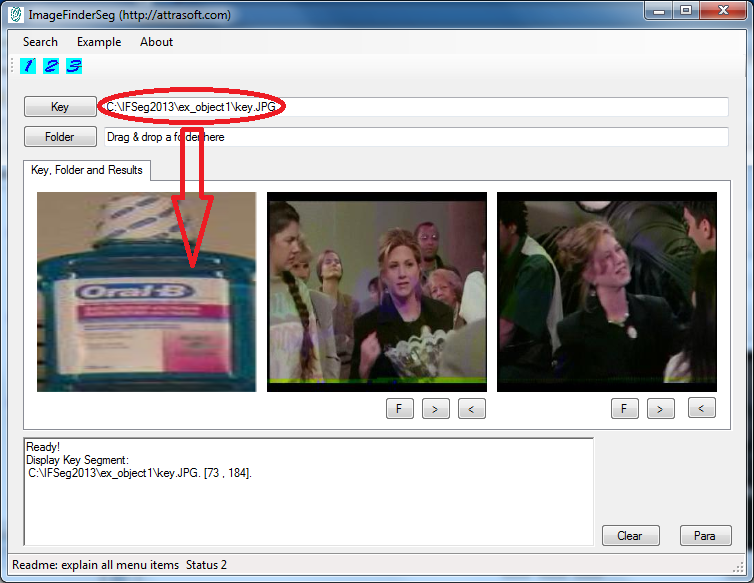
Figure 7.
Step 1, selecting a key. After selecting
a key image, the image will be displayed in the Key Panel.
2.
Drag
& drop a folder
Drag
& drop the folder, C:\IfSeg2013\ ex_object1\, to the second text box;
see Figure 8.

Figure
8. Step 2, selecting a
folder. After selecting a folder, the first image will be displayed in the
Folder Panel (middle picture box). The
“F” button goes to the first image; the “>” button goes to the next image;
and the “<” goes to the previous image. All sub-folders will be included.
3.
Search.
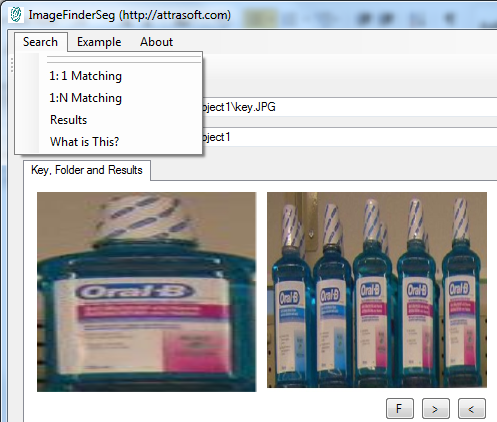
Figure 9. Search menu.
To make a 1:1 search,
·
Click
the “Search/1:1 Matching” menu item in Figure 9.
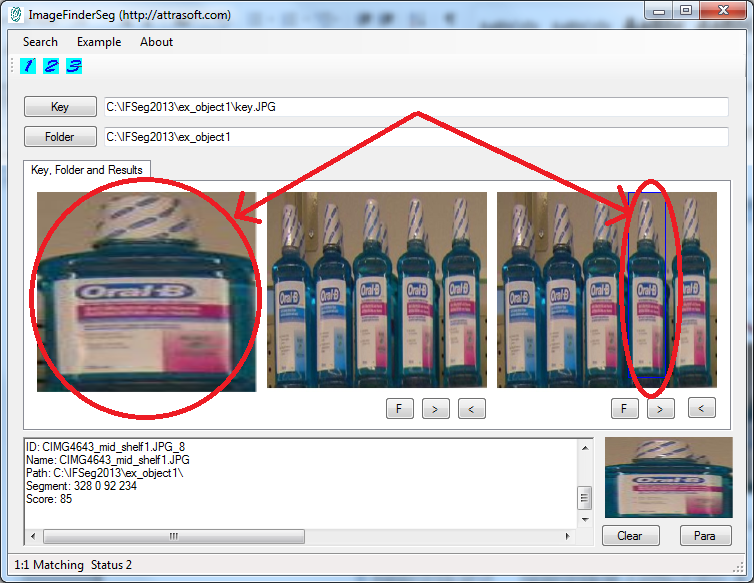
Figure 10.
Images that matched the “key” will be displayed in the Results Panel. A
blue box indicates the location.

Figure 11. The matched score and coordinates, (x, y, w,
h), are given in a text file: “.\data\c.txt”.
To see the first matched image,
click the “F” button in the Results Panel (see Figure 5). To
see the next matched image, click the “>” button in the Results Panel.
The key and the matched images are displayed side-by-side.
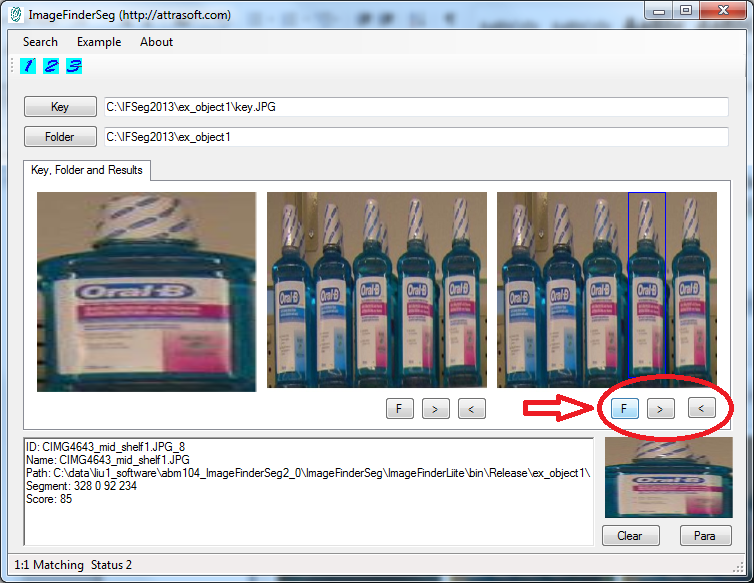
Figure 12. To see the first matched image,
click the “F” button in the Results Panel. To see the next
matched image, click the “>” button in the Results Panel. The key and
the matched images are displayed side-by-side.
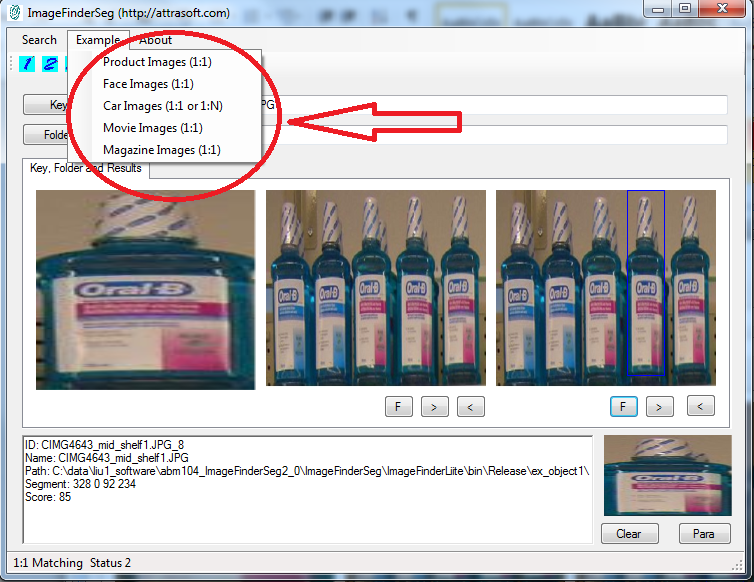
Figure 13. Completing the example in
two clicks.
This example can be completed in two
clicks:
·
Click
the “Example/Product Image” menu item;
·
Click
the “Search/1:1 Matching” menu item.
2.2 User’s Guide
To search for an image segment in a
folder in your computer:
1.
Select
a Key
Step 1, selecting a Key, can be
completed by dragging & dropping an image to the first text box;
2.
Select
a folder
Step 2, select a folder, can be
completed by dragging & dropping a folder to the second text box;
3.
Search
Step 3, Search, can be completed by clicking
menu item “Search/1:1 Matching” or “1:N matching. “Search/1:1
Matching” will match the key against the image displayed in the Folder panel in
Figure 3. “Search/1:N Matching” will match the key
against the all images in the selected folder.
To see the results:
1. Click the Results “F” button
(Figure 5);
2. Click the Results “>” button
(Figure 5).
2.3 More Examples
There are more examples in the
software:
C:\IfSeg2013\
ex_object1\
C:\IfSeg2013\
ex_object2\
C:\IfSeg2013\
ex_object3\
C:\IfSeg2013\
ex_object4\
C:\IfSeg2013\
ex_object5\
Each example can be completed in a
few seconds. The first example is done in section 2.1. We will go through all 4
remaining examples in Figure 13.
The second example uses data in C:\IfSeg2013\ ex_object2\.
·
Click
the “Example/Face Image (1:1)” menu item to get Figure 14;
·
Click
the “Search/1:1 Matching” menu item to get Figure 15.
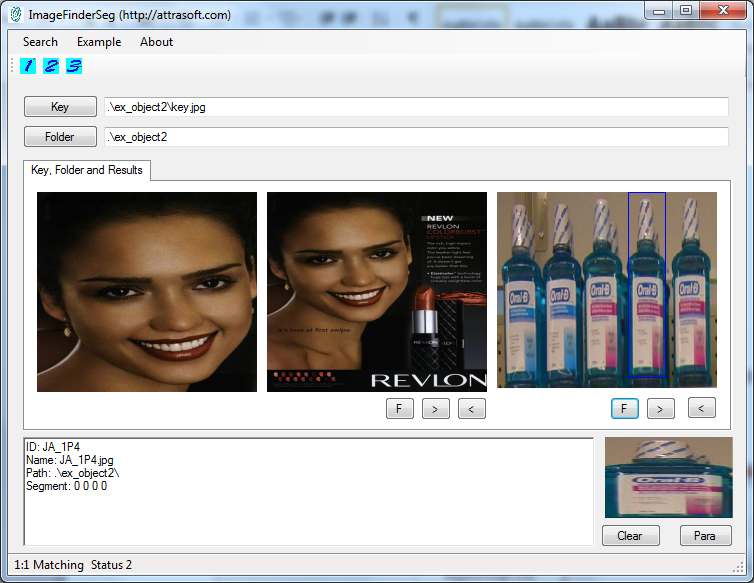
Figure 14. Click “Example/Face Image (1:1)”.
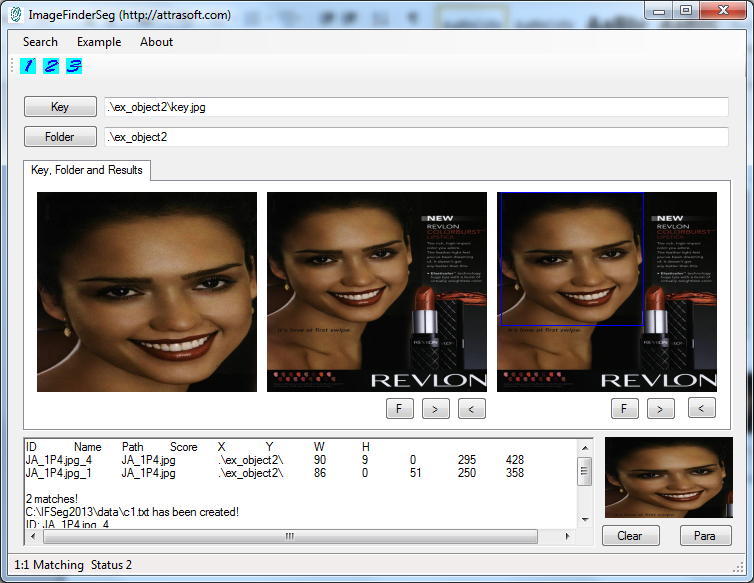
Figure 15. Click the “Search/1:1 Matching”
The third example uses data in C:\IfSeg2013\ ex_object3\.
·
Click
the “Example/Car Image (1:1)” menu item to get Figure 16;
·
Click
the “Search/1:1 Matching” menu item to get Figure 17.
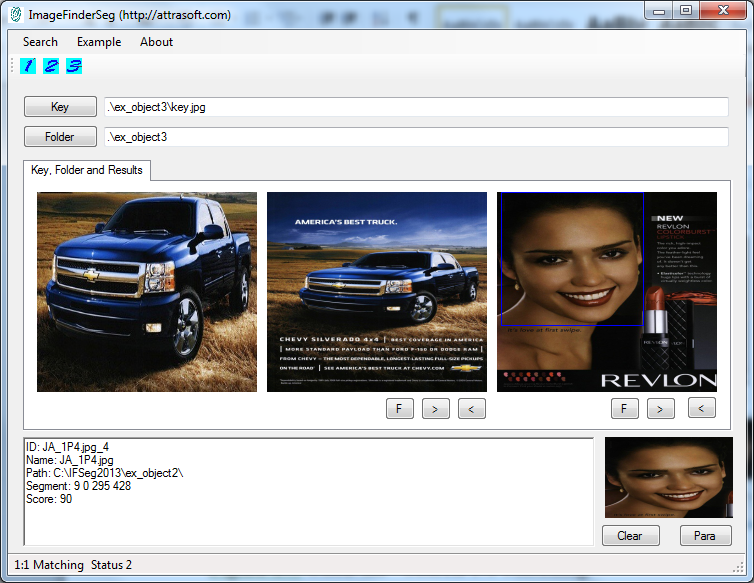
Figure 16. Click “Example/Car Image (1:1)”.
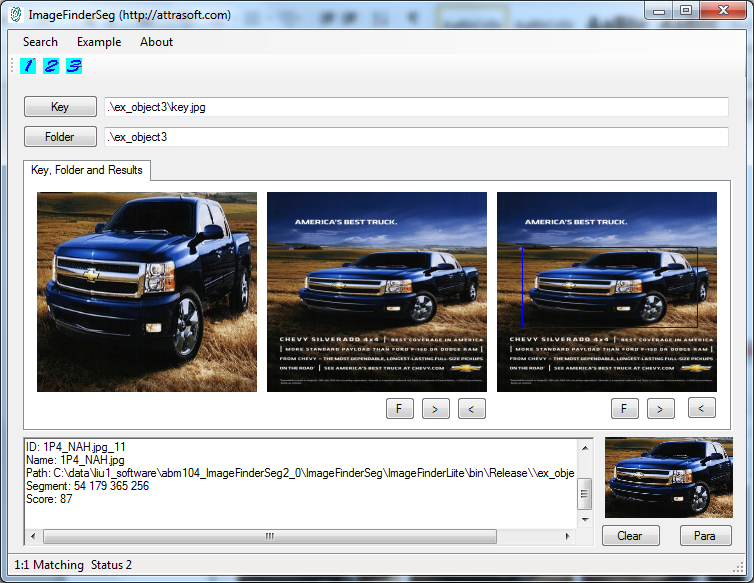
Figure 17. Click the “Search/1:1 Matching”
The fourth example uses data in C:\IfSeg2013\ ex_object4\.
·
Click
the “Example/Movie Image (1:1)” menu item to get Figure 18;
·
Click
the “Search/1:1 Matching” menu item to get Figure 19.
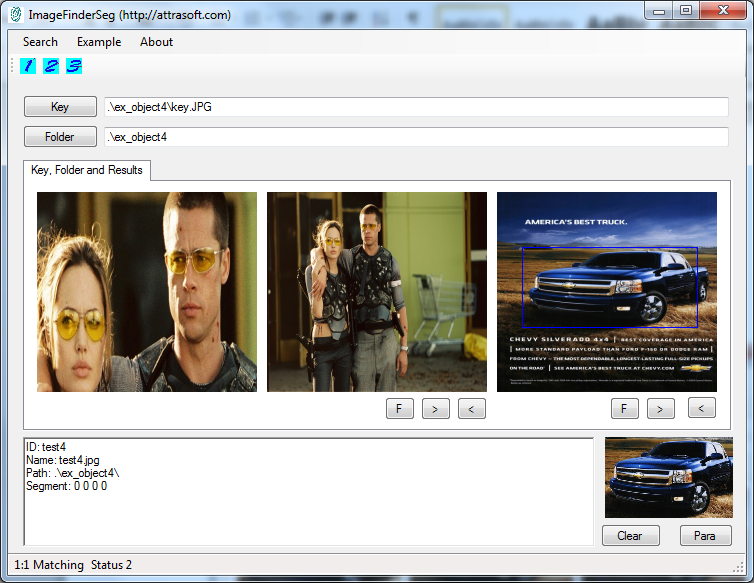
Figure 18. Click “Example/Movie Image (1:1)”.

Figure 19. Click the “Search/1:1 Matching”
The fifth example uses data in C:\IfSeg2013\ ex_object5\.
·
Click
the “Example/Magazine Image (1:1)”;
·
Click
the “Search/1:1 Matching” menu item to get Figure 20.
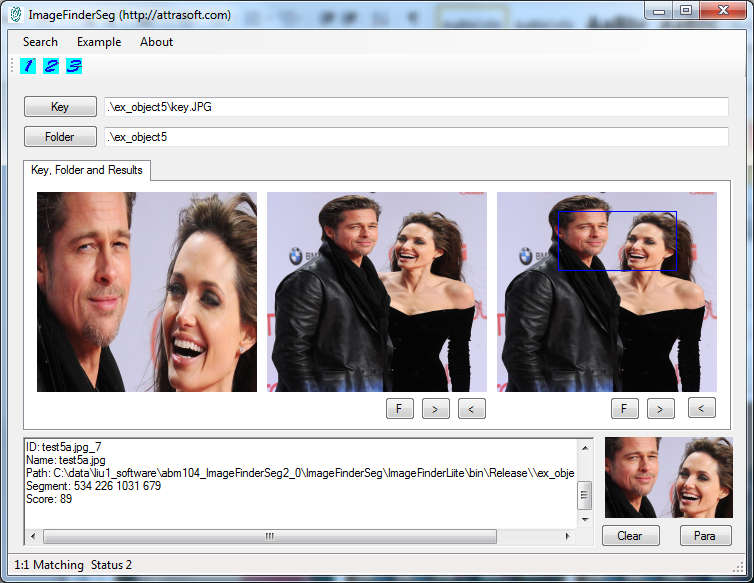
Figure 20. Click the “Search/1:1 Matching”
2.4 Detailed Matching Results
The results are stored in a text
file. To see the results, click:
Search/Results.
3. Advanced Users
3.1 Types of License, Software Limits, and Support
ImageFinderSeg has three different types of
licenses:
·
Personal License;
·
Business License;
·
Commercial License.
This package is for personal use only, which
has the following limitations:
·
You cannot sell a service based on any
computation results produced by this software. You must purchase a separate
annual license for commercial use from Attrasoft.
·
You cannot use the software to
perform work for which you will get paid for. You must purchase a separate
annual license for business use from Attrasoft.
For a business annual subscription or a commercial annual subscription,
please contact Attrasoft at gina@attrasoft.com. Operation of the software requires only three
clicks and some parameter settings. If customer support is required, there will
be an additional fee for customer support.
Customization is available for additional requirements.
3.2 Customized Software and Services
Attrasoft will also customize the software
for:
·
Variation
of images such as scale, rotation, flipping, translation, lighting
condition(s),
·
Different
data acquisition devices (ex., camera vs. scanner),
·
Catalog
images vs. Operation images, etc,
·
Searching
for an object in an image,
·
Different
Interface,
·
Fine-tuning
internal parameters or programming,
·
Emphasizing
speed, i.e. searching a huge amount of images very fast,
·
Licensing
the technology,
·
Etc.
In
addition, Attrasoft offers services such as:
·
Image
Search Online Hosting Service
·
Faster
Image Search
·
Video
Search: Download Demo (http://attrasoft.com)
·
Video
Index
·
ID
Image Duplication Verification
·
Trademark
Identification
·
Etc.
3.3 Q & A
Q: What are ImageFinderSeg’s
running requirements?
A: Updated
Microsoft Windows.
Q: What is an image?
A: An
image is a file with the extension *.jpg, *gif…
Q: How to download an image?
A: Go to
a web site;
Right
click an image;
Click
‘Save Picture As’ …
Save to
C:\temp\; now the image is saved in c:\temp. Double click it to see it.
Q: Can you search Video?
A: The
difference between video search and image search is that a video has a lot more
images. Attrasoft VideoFinder deals with Videos.
Q: How to handle multiple key
images?
A: You
can only search one key image at a time; however, you can search multiple
times. Just load all of your images to a single folder in your computer first,
say c:\temp\, and then search one image at a time from that folder. Customization can also address speed.
Q. What is Customized software?
A. Customized
software can be built for special requirements such as:
·
Variation
of images such as scale, rotation, flipping, lighting condition(s),
·
Different
data acquisition devices (camera vs. scanner),
·
Catalog
images vs. operation images, etc,
·
Searching
for an object in an image,
·
A
different web interface,
·
A
document image search,
·
Fine-tuning
internal parameters or programming,
·
Emphasizing
speed, i.e. it can search a huge amount of images very fast,
·
Licensing
the technology.
Contact: gina@attrasoft.com